Frigidaire Dryers
NOTE: Chapter 2 covers problems common to almost all Frigidaire dryer designs, like heating problems.
THIS chapter covers only diagnosis and repairs peculiar to Frigidaire-built dryers.
If you do not read Chapter 2 thoroughly before you read this chapter, you probably will not be able to properly diagnose your Frigidaire machine!
Figure WS-1 shows the general layout of these machines.
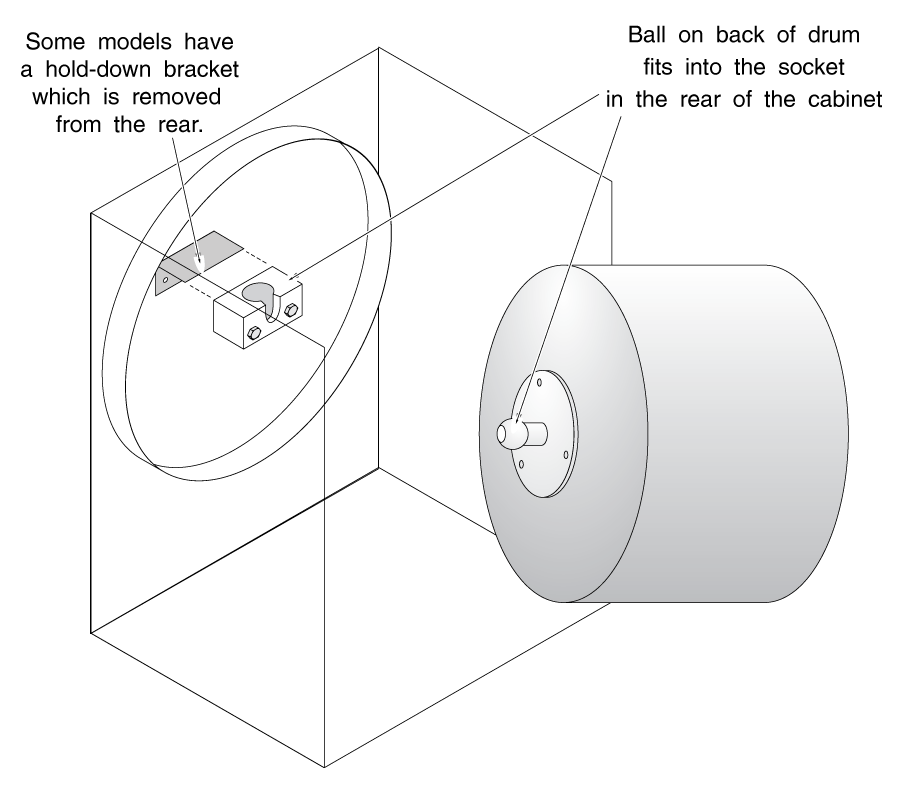
The front of the drum is supported by two small drum glides on top of the clothes port, which ride on the inside lip of the front of the drum. The rear of the drum is supported by a ball shaft in the center of the drum which rides in a plastic socket attached to the rear wall of the cabinet.
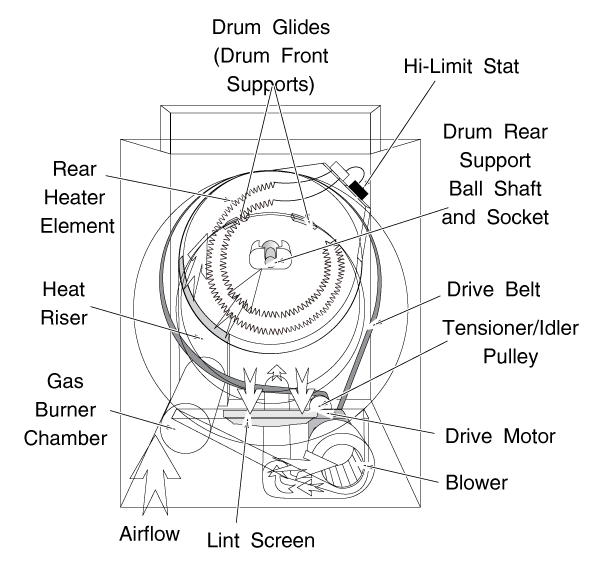
The blower fan is attached directly to the front of the drive motor. The drive belt comes directly off the rear of the motor and goes completely around the drum. The motor and blower are mounted on the right side of the baseplate of the machine. A spring-loaded idler pulley, mounted directly to the motor baseplate, keeps tension on the belt.
In gas models, the burner is mounted on the lower left side of the baseplate. It is accessible by removing the kickplate. The single circular heater element of electric models is located in a housing behind the drum.
The operating thermostats in these machines are located in just inside the door, on the right side of the door sill. The high-limit thermostats are mounted on the upper right side of the duct behind the drum. All thermostats can be accessed by removing the top panel of the cabinet as described in section 7-4.
The most common problems in these machines are as follows:
1) Broken belts. The drum doesn't turn. Replace as described in section 7-4.
2) A loud growling noise, caused when the idler pulley seizes. Replace the idler arm as described in section 7-3.
3) Heating problems as described in Chapter 2. To access the gas burner, remove the kickplate as described in section 7-4. The heater element can be tested by lifting the cabinet top, but changing it requires drum removal.
4) A metal-to-metal scrubbing sound, caused when the front drum glides wear off, or the rear drum support wears out. Remove the front of the machine and drum as described in section 7-4. Replace the rear drum bearing or scrape off the old glides and felt seal and glue new ones on. Bearing and glide kits are available from your parts dealer.
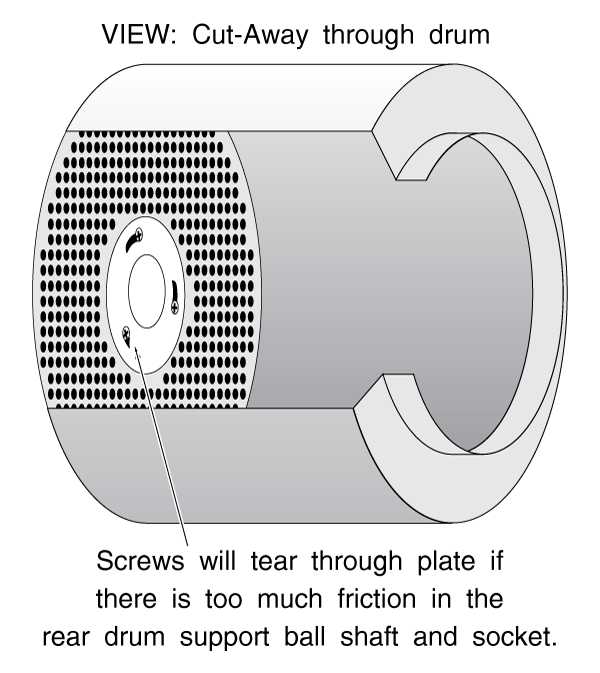
5) Look at the circular center plate inside the rear of the dryer drum. (Figure WS-2) If the screws in the plate appear to be ripping it, you need to replace not only that plate, but also the rear drum ball shaft and bearing, as described in section 7-4.
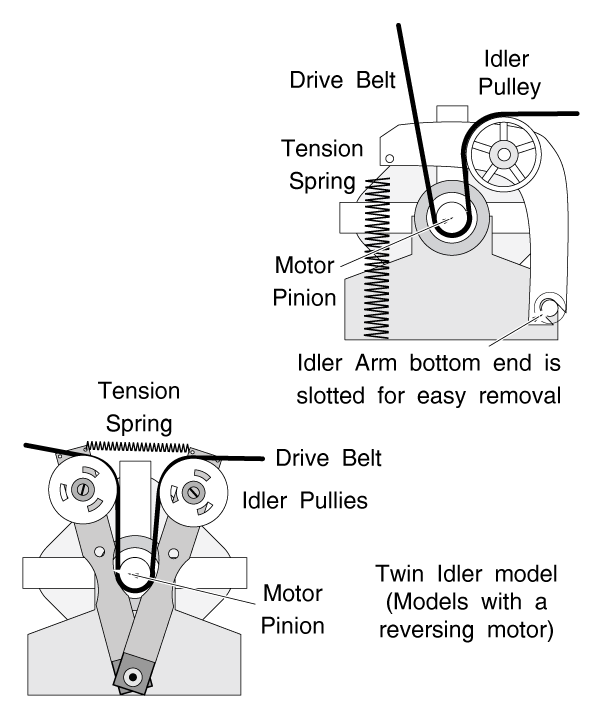
Looking at the rear of the machine, remove the inspection plate on the lower left corner. Inside this plate are the motor and idler. Slip the belt off the idler. The idler bracket is then easily removed as shown in figure WS-3.
If you need to service the motor or blower wheel, they are easily removed as a unit. Remove the two screws holding down the motor frame. The front end of the frame is attached by tabs that slip into the baseplate, so after removing the two screws, the motor and blower wheel will lift right out as an assembly. The blower cover is pressed against the blower housing by a spring between the cover and the motor.
In some models, the blower wheel is held to the motor shaft by a screw and a washer. In others, by a left hand thread; hold the motor shaft with a pair of vice grips and turn clockwise to remove it.
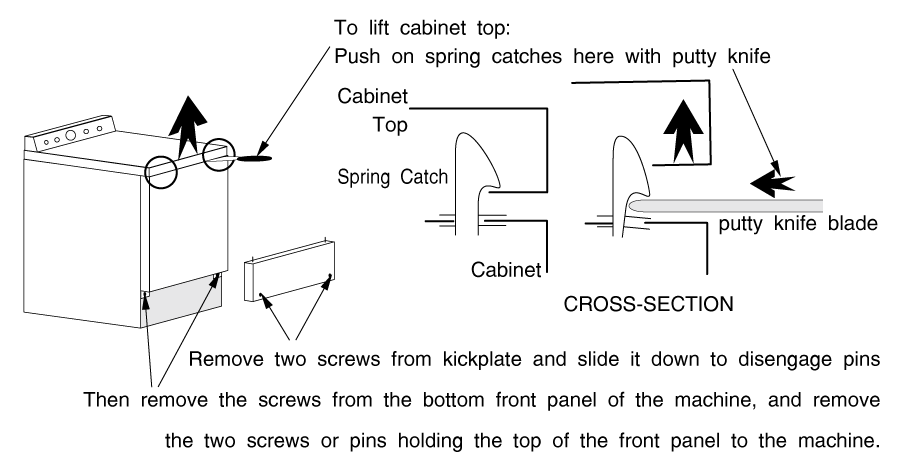
Remove the two screws at the bottom of the kickplate, then drop it down slightly to disengage the pins from the top.
If you are going to remove the drum, take tension off the belt as described in section 7-3.
If your machine has an enamelled top, raise the top of the cabinet by releasing the top corner clips as shown in figure WS-4. If you have a model with a galvanized cabinet top, remove the screws from the top panel and lift off the panel.
With the cabinet top raised, you can test the heater element for continuity. If it is bad, remove the drum as described below and replace it. If the new heater is not pre-stretched, stretch it to approximately the correct length, but do not overstretch.
It is better to leave it a little short, and work it to the correct length while in place. Start from the middle of the element and work outward. And don't forget to check the insulators and replace them if cracked or broken.
Remove the one screw holding the blower suction duct to the blower housing. Then remove the two screws holding on the bottom of the cabinet front (four, on some models.) Next, remove the two screws at the top of the cabinet front panel. Disconnect the door switch as you lift the cabinet front off. Remember, as you remove the cabinet front, you are removing the drum front support, and the drum will be free-floating. If you are simply replacing the belt, slip the new belt around the drum and put the cabinet front right back on.
As soon as you have removed and set aside the cabinet front, lift the rear end of the drum and the ball shaft will disengage from its bearing socket. (Figure WS-5) (Note: some models have a bracket that holds the ball down in the socket; this bracket is removed from the rear.) With the drum out, you can now replace the ball shaft and bearing socket. A shaft and bearing kit is available from your parts dealer, including a special lithium grease used to lubricate the socket.
Reassembly is basically the opposite of disassembly.
Please share our .