Whirlpool & Kenmore 29″ Models
NOTE: Chapter 2 covers problems common to almost all dryer designs, like heating problems. THIS chapter covers only diagnosis and repairs peculiar to Whirlpool-built machines.
If you do not read Chapter 2 thoroughly before you read this chapter, you probably will not be able to properly diagnose your Whirlpool or Kenmore machine!
Note that Whirlpool makes two different dryers. This chapter applies if the cabinet of your dryer is 29 inches wide. If your dryer is 27 inches wide, see chapter 3a.
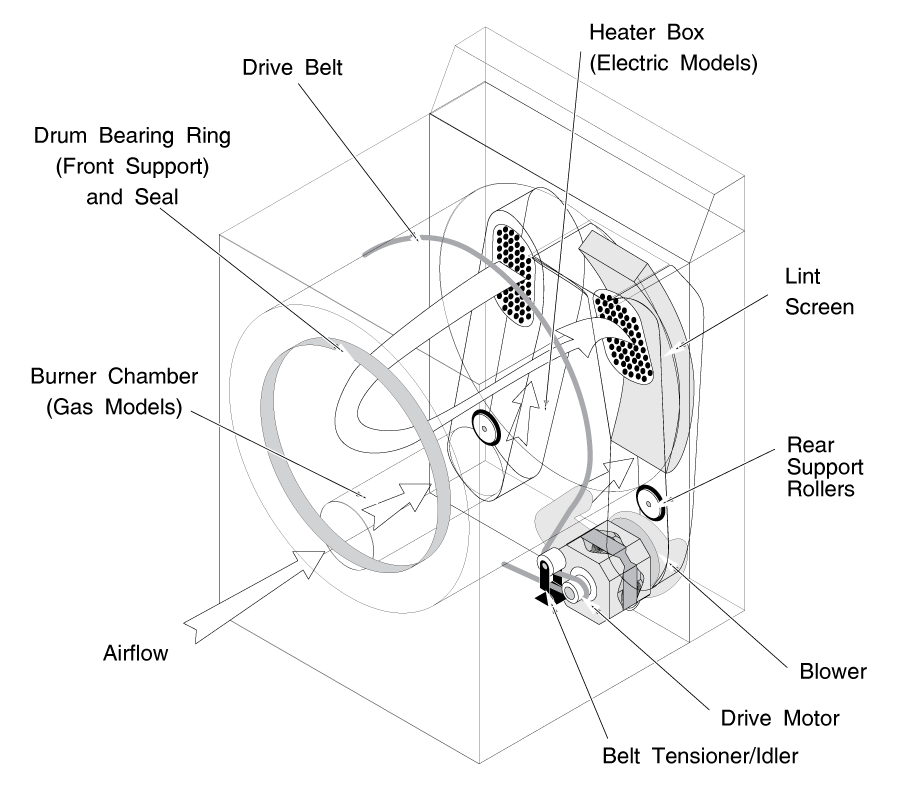
Figure W-1 shows the general layout of these machines.
The drum is supported at the front by a slider around the inside lip of the drum, and at the rear by support rollers.
The blower fan is attached directly to the rear of the drive motor. The drive belt comes directly off the front of the motor and goes completely around the drum.
The two most common problems in these machines are:
1) Noisy operation, usually a loud rumbling sound getting progressively worse over time, caused by worn drum support rollers. Usually this appears in machines about 7-15 years old. To replace the rollers, remove the drum as described in section 3-3.
2) No heat, caused by a broken ignitor. See chapter 2, section 2-3(a) to replace.
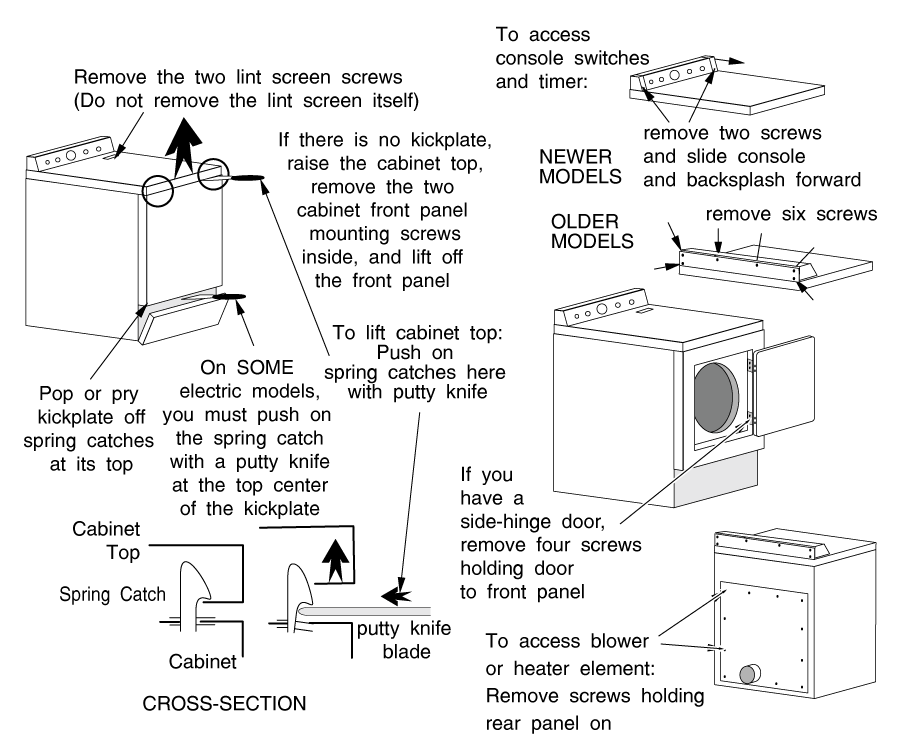
If you hear a loud, regular clackety-clacking as the dryer drum is turning, and you do not have any metal zippers or buttons inside the drum, some coins may have gotten inside the vanes. Look inside the dryer drum. One of the three tumbling vanes will be plastic. Turn the drum until the plastic vane is on top. Open the top of the cabinet as shown in figure W-2. Remove the screws that hold the vane in place and remove any coins that have gotten in the vanes.
Another fairly common problem is that the dryer door support cables break. See figure W-3 for a cross section of the cable mechanism. To access the cables, lift the top of the cabinet and remove the kickplate. In models without a kickplate, you will need to remove the front of the cabinet as described in section 3-3.
Unplug the machine and move it away from the wall far enough so the console will not hit the wall when you raise the cabinet top.
Lift the lint screen access cover and remove the two screws inside.
NOTE: Do not remove the lint screen unless necessary, and only after removing the screws. This will prevent your accidentally dropping the screws down the lint screen slot. If you accidentally drop anything down the lint screen slot, it goes right into the blower wheel. If this happens, see section 3-5 for access to the blower wheel.
Lift the top of the cabinet as shown in figure W-2. If you have a model with a kickplate, remove the kickplate, too.
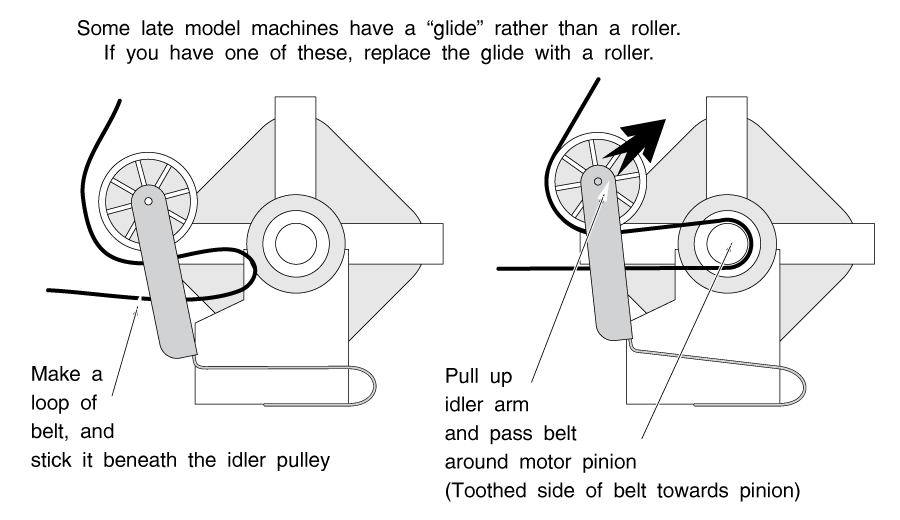
If you have a kickplate model, remove the belt from the motor pinion. The easiest way is to push the belt tensioner to loosen the belt with your thumb, and use the fingers of the same hand to slip the loop of belt off the motor pinion. (See figure W-5)
Loosen (but don't remove) the bottom screws holding the front of the cabinet on. Remove the two top screws inside the cabinet that hold on the cabinet front.
CAUTION: Remember that the front of the cabinet supports the front of the dryer drum! Remove the cabinet front carefully!
Balance the whole shebang against your knees and disconnect the wire leads from the door switch. Hold the dryer drum in place and lift the front of the cabinet off.
NOTE: In certain drop-door models, (known in the parts houses as "hamper-door" models) there may be a couple of extra screws holding on the front of the cabinet, in the middle of the hinges.

To remove the dryer drum from the cabinet:
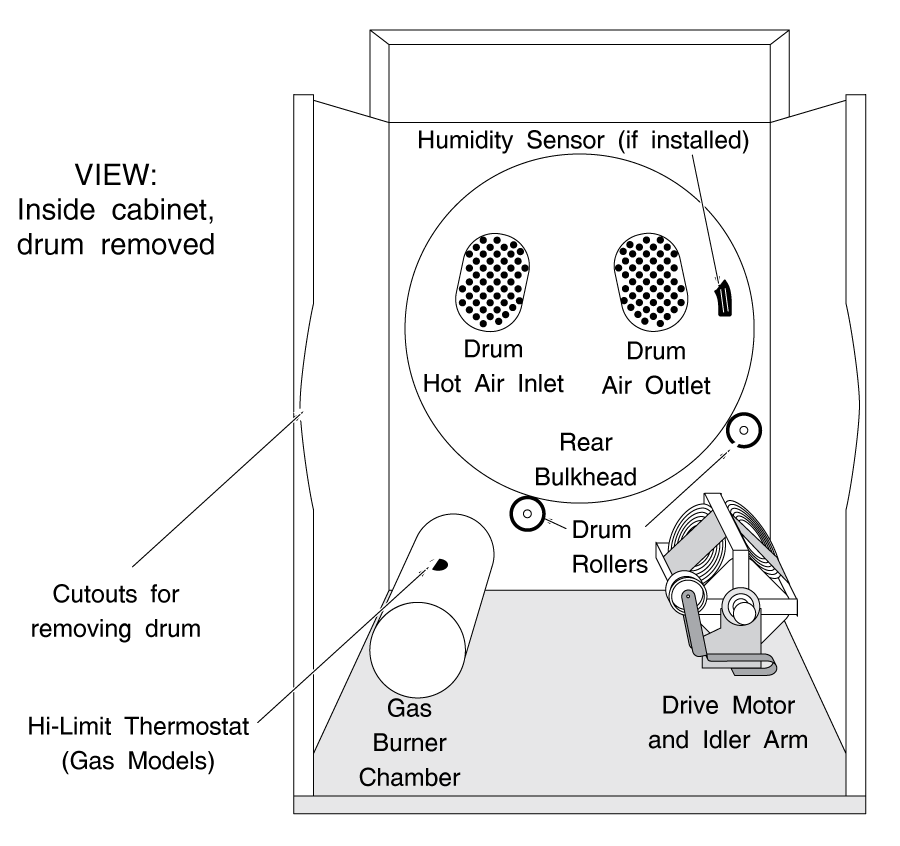
1) In kickplate models, you have already removed the belt tension, so slide the drum straight outward through the curved cutouts in the cabinet sides. (See figure W-4)
2) In models without a kickplate, you must hold the dryer drum in place while you reach beneath it to remove the belt tension as described previously. It takes a little acrobatics, but it isn't too tough.
The drum support rollers will now be easily accessible. (See figure W-4) The one on the left tends to be worn more than the other one, but replace them both. When replacing, use only ONE drop of oil on the hub. Oil tends to attract dust and lint, and over-oiling them can actually shorten the life of them.
While you have the dryer dismantled, vacuum out all the dust you can. Also, it's a good idea to replace the belt and belt tensioner whenever you have the dryer dismantled to this point. It is cheap insurance against future problems.
HINT: Coins that find their way out the rear drum seal tend to end up directly beneath the left drum roller. I found eight bucks worth of quarters in one machine!
Inspect the rear drum seal (attached to the back of the dryer drum.) If it is badly worn, replace it. Your parts dealer will have a seal kit, and it is actually quite inexpensive and easy to glue a new one in place.
Re-assembly is basically the opposite of disassembly.
Installing the drum can be a bit tricky, especially if you don't have a kickplate machine. Make sure the belt is around the drum before you put the drum in place. Before you put the cabinet front on, reach beneath the drum and make sure the two rollers are in the groove of the drum. If you have a kickplate machine, you can install the cabinet front at this time. If you don't have a machine with a kickplate, you have to line up and put tension on the belt before you put on the cabinet front.
When the drum is in place, make sure the belt is flat on the drum and closely line up the belt on on the old belt skid mark on the drum. To tension the belt, make a loop of belt and stick it under the tensioner as shown in figure W-5. Push the tensioner with your thumb and slip the belt loop around the motor pinion.
After installing the dryer front, roll the dryer drum around several times by hand. As you turn it, check that the belt is flat all the way around.
Also check that the rear drum seal is flat all the way around, and not pinched between the drum and the rear support plate.
The heater element is accessed through the back of the dryer, as shown in figure W-6.
The heater elements are located inside the riser on the right, as you look at the back of the machine. You can test the elements for continuity without removing the heater. To remove the riser, raise the top of the cabinet and disconnect the strap that holds the top of the riser.
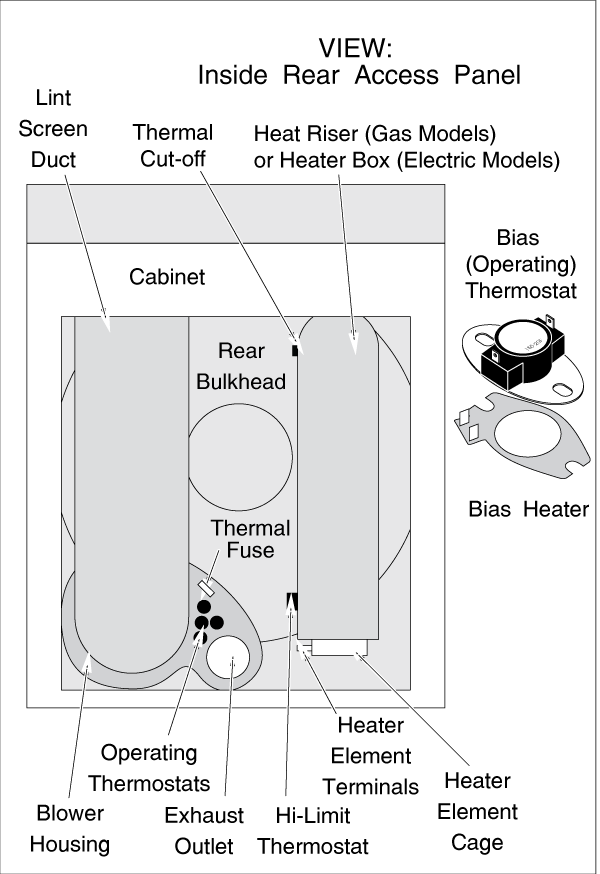
To get to the blower wheel, remove the back of the dryer as shown in figure W-6.
The blower wheel is under the bottom of the lint screen duct to your left, as you look at the back of the dryer.
The operating thermostats are at the blower wheel outlet.
In electric models, the hi-temperature cutout thermostat is mounted to the heat riser; in gas models, it is on top of the burner chamber.
These clothes dryer machines use operating thermostat so control the temperature inside the drum, and hi-limit stats to prevent overheating of the dryer drum.. Many machines also have extra temperature controls, such as bias thermostats and heaters, hi-temperature cutoffs, and thermal fuses.
Bias thermostats are just like regular operating thermostats, except that they are mounted inside a bias heater. When the bias heater is energized, it generates a small amount of heat, which causes the operating thermostat to open sooner, keeping the dryer drum cooler inside. Thus a bias heater allows a single operating thermostat to act like both a hi-temp and a lo-temp operating thermostat.
A thermal fuse is found on the blower outlet, right next to the operating thermostat(s.) This fuse will blow when too high a temperature is sensed at the outlet; usually when one of the operating thermostats has failed. If it blows, the motor may not start, or you may get no heat (no voltage to the burner.)
A thermal cut-off is mounted on the clothes dryer heater box. It is a back-up for the hi-limit stat. Whenever you replace it, you should replace the hi-limit stat, too. A high-temperature condition causes it to open, an overheated grounded heat element may also cause it to open.
Please share our .