MAYTAG including Atlantis models;
NOTE: Chapter 2 covers problems common to almost all Maytag dryer designs, like heating problems.
THIS chapter covers only diagnosis and repairs peculiar to Maytag-built dryers.
If you do not read Chapter 2 thoroughly before you read this chapter, you probably will not be able to properly diagnose your Maytag machine!
Figure ML-1 shows the general layout of these machines.
The drum is supported at the front by two small glides beneath the drum. The rear of the drum is supported by rollers.
The cabinet is solid on three sides, so almost everything is accessed through the front of the machine. There is a small inspection panel on the bottom right, as you look at the back of the machine, through which you can get to the belt tensioner and idler pulley.
The blower fan is mounted directly to the front of the drive motor. The drive pulley and belt come off the rear of the motor, and the belt goes completely around the drum. The motor and blower are on the left side of the baseplate of the machine. A spring-loaded idler, mounted to the motor baseplate, keeps tension on the belt.
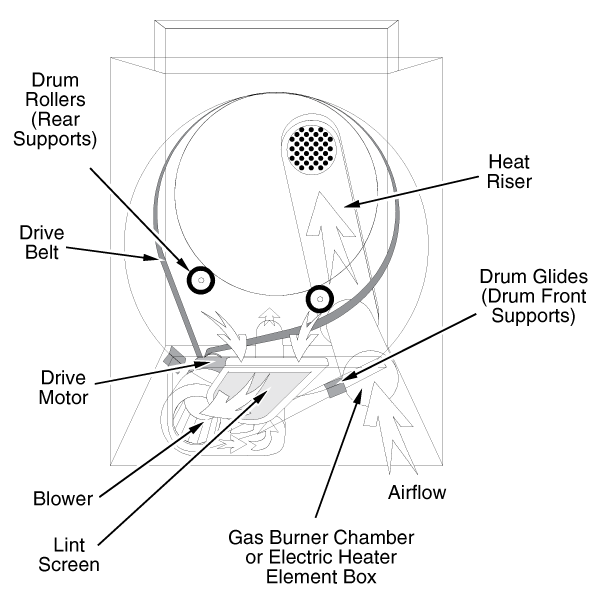
In gas models the burner is on the right side of the baseplate of the machine. It is accessible through the small inspection door on the lower right front of the machine.
In electric models, the heater is located in a cylindrical heater box in the same place as the burner chamber.
Operating thermostats in these machines are located on the front of the blower exhaust housing. Hi-limit stats are located on top of the burner chamber in gas models, and directly on top of the heater box in electric models.
The most common problems in these machines are as follows:
1) Loud rumbling or banging noise, getting progressively worse over time, or squeaky sounds coming from the drum support rollers. Replace as described in section 5-4.
2) Heating problems as described in chapter 2.
3) Drum doesn't turn, caused by a broken belt. Replace as described in section 5-4.
4) No airflow. These machines seem to be particularly susceptible to getting clogged up with lint. Remove the front panel and clean out the blower as described in section 5-3.
5) These machines seem to be susceptible to things slipping past the lint screen, especially pens and pencils and such. If this happens, you will hear a loud grinding sound that seems like it resounds through the whole machine. Open the blower cover and inspect the blower wheel as described in section 5-3. Replace the blower wheel if the blades are chewed up.
Two different cabinets have been used on these machines. Old-style cabinets are pretty straightforward. Remove the two screws at the bottom of the cabinet front. Lift the bottom of the front panel until the clips at the top of the panel disengage from the top. Be careful to note the position of any door switch or other wiring and disconnect it as you remove the panel. To lift the cabinet top, remove the two screws beneath the front corners.
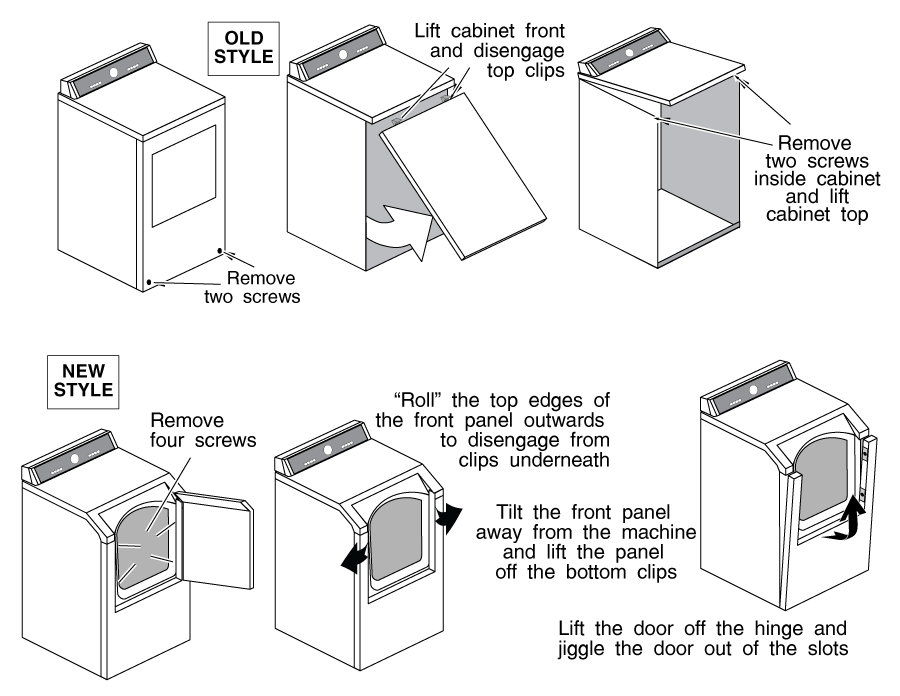
The new-style cabinets, with wrap-around doors, are a little trickier. After removing the four screws inside the door opening, you have to kinda "roll" the top corners of the front panel outwards (Figure ML-2) to disengage them from the clips beneath them. The top of the front panel is then free from the cabinet, and you tilt it forward and lift it to remove it. The door can then be removed by lifting it off its hinges and "jiggling" the hinges out of their slots. To remove the cabinet top, slide it forward and lift.
BLOWER
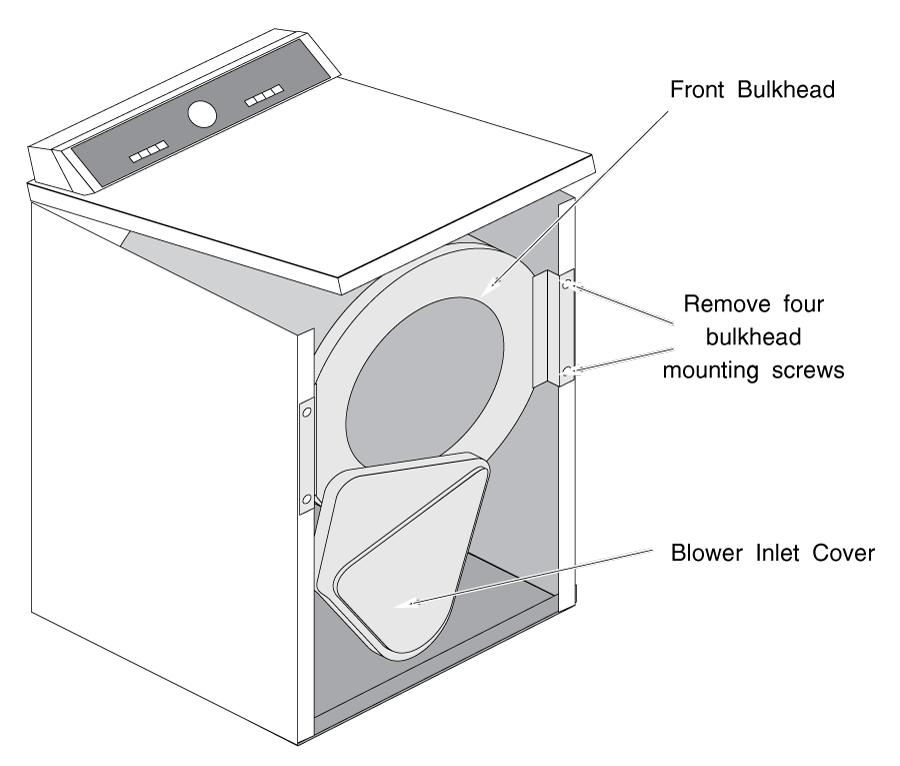
To inspect, clean or replace the blower wheel, remove the blower inlet cover. The blower wheel is held onto the motor shaft with a spring clip.
To inspect and/or replace drum glides, belts or electric heater elements, you must remove the drum as follows:
1) Open the inspection panel on the back of the machine and release belt tension.
2) Remove the cabinet front as described in section 5-3.
3) Remove the four screws from the front bulkhead as shown in figure ML-3. While holding the drum in place, lift out the bulkhead and set it aside. You can now lift out the drum.
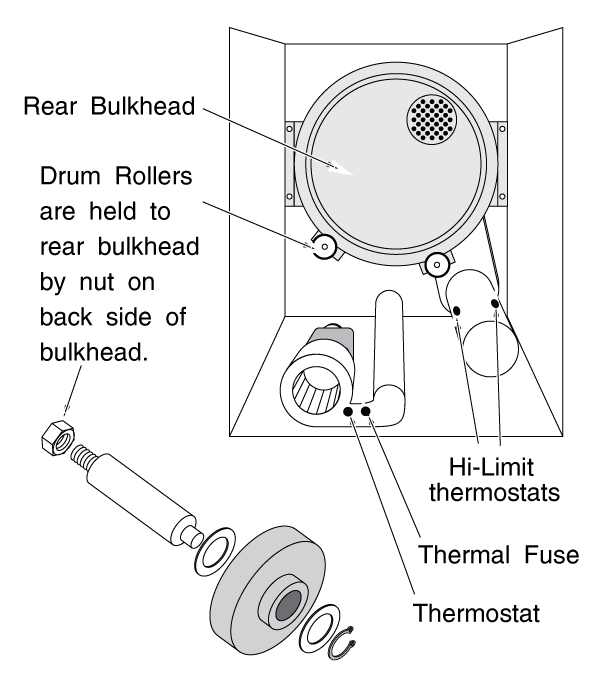
The drum glides are on the lower front corners of the inside of the bulkhead. They are riveted in place. If you need to change them, you must drill out the rivets and rivet new ones in place. The rivets come with the glide kit.
The drum support roller shafts are held onto the rear bulkhead with a nut. (Figure ML-4) Remove the nut to remove the roller wheels.
The front and rear drum seals can also be inspected for wear at this point. They are glued onto the front and back bulkheads. If you need to replace them, you must scrape off the old adhesive and glue in new ones.
In electric models, the heater element is located inside the heater box on the right side of the baseplate of the machine. Test it for continuity as described in Chapter 2, and if defective, replace the heater box.
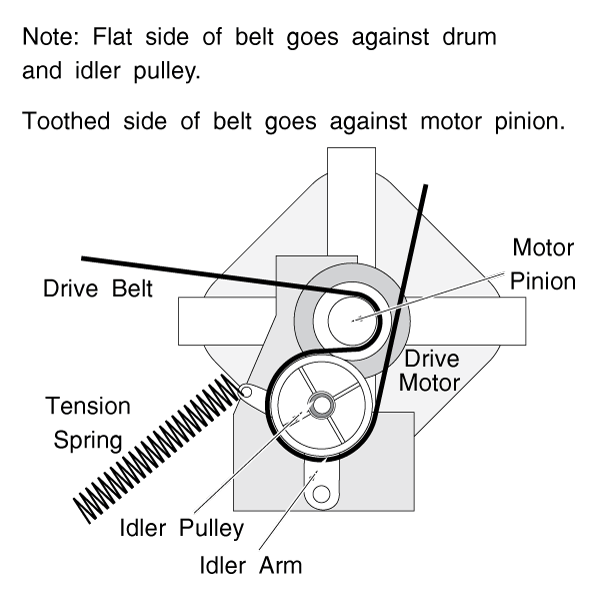
Don't forget to check that the idler rolls smoothly. Replace if sticking or binding, by pulling off the spring clip that holds the idler pulley to its shaft.
BELT REPLACEMENT
Getting the belt around the idler in these clothes dryer machines can be a real son-of-a-gun. For one thing, the belt is sort of upside-down compared to other machines; the flat side goes against the drum and idler. (See figure ML-5) There's also a lot of spring tension.
Try to position the belt as closely as possible on the old skid marks on the drum. And after you get it on, slowly rotate the drum a few times to make sure the belt doesn't jump off the idler.
Please share .