Washing Machine Repair
NOTE: Chapter 2 covers problems common to almost all washer designs.
THIS chapter covers only diagnosis and repairs peculiar to GE-built machines.
If you do not read Chapter 2 thoroughly before you read this chapter,
you probably will not be able to properly diagnose your machine!!!!
The old-style GE washing machine design uses a single-speed reversing motor, which is belted to the transmission. When viewed from the top, the motor turns clockwise for the agitation cycle, and counterclockwise for the spin cycle (Figure GE-1.)
A simple centrifugal clutch prevents the motor from taking heavy shock loads when starting. Some models have a two-speed clutch (only the clutch is two-speed, not the motor.) The second speed is slower, for "gentle" cycles, and is solenoid-activated.
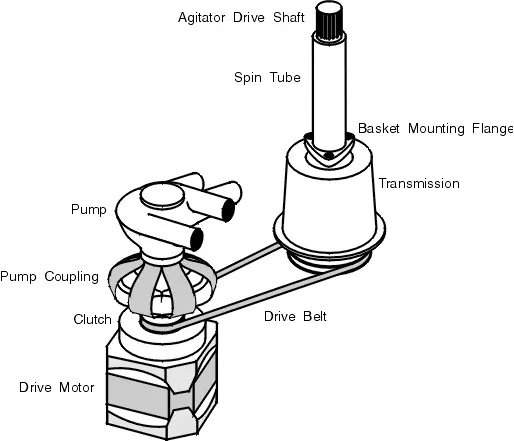
The pump is also direct-reversing. It is connected directly to the motor through a flexible coupling. Most GE pumps have two impellers and four hose connections. One impeller recirculates water during the wash and rinse cycles, and the other pumps water out of the tub during the spin cycle.
See Figure GE-2 for details about opening the cabinet and console.
In raising the top of the cabinet, you must keep two things in mind:
1) It is better to use a putty knife, rather than a screwdriver, to push the catches. There is less chance of chipping or scratching the finish.
2) Inside the lid, on the top right side, is the recirculation nozzle. (see figure GE-7) The nozzle fits through a hole in the soft plastic skirt attached to the top of the cabinet. You must push the nozzle out of the skirt as you raise the cabinet top, and insert the nozzle back through the skirt when you lower it.
Most GE machines have a wiring diagram in an envelope inside the console.

Since the operating system is so simple, the easiest way to diagnose a mechanical problem is to open up the back of the washer and observe things while you run the washer through its cycles. Following are the most common problems:
SYMPTOM: WATER LEAKS
See section 2-4 on leaks and backed up drains.
Besides the usual loose or worn hoses and fill system problems, leaks in these washers most commonly come from one of five places:
1) Look at the pump through the back of the washer. There is a small inspection hole (figure GE-4) in the pump body that weeps water when the pump's internal seal is leaking. You may not see any water directly, but you will see its tracks leading down the pump body. See section 5-4 on pumps.
2) These washers are quite different from others in that the tub is attached to the cabinet, rather than the transmission. If there is an imbalance, only the basket and drive train wobbles; not the whole tub. (See Figure GE-3)
Between the transmission and tub, there is a large flexible rubber seal called a boot. This boot can get brittle and crusted with detergent. It can develop leaks, or even shake loose, causing a MASSIVE leak (during the fill cycle, the water dumps straight onto the floor instead of filling the tub). Look for water coming from around the top of the transmission. See section 5-6.

3) Since the basket is free to move around in the tub, the basket may hit the tub if there is too large an imbalance. If this happens too often, it can actually wear a hole in the tub. Usually such holes will appear around the top of the tub.
If you have holes worn in the tub, you can sometimes patch them with an epoxy patch kit, available at your appliance parts dealer. It may prove to be a temporary repair, but you can always do it again, and it's cheaper than trashing the washer. I also recommend an excellent product called Slapstix. It is a plastic abrasion-resistant patch kit made specifically for GE washers. As of this writing, it is not yet widely available, but ask your dealer or call 800-936-5282.
4) The tub fittings may leak. If you detect a leak from the tub drain or other tub fitting, remove the basket as described in section 5-6.
5) You may get a calcium or detergent buildup around the fill or recirculation nozzle. Such a buildup can cause the nozzle to spray water over the top of the tub. Clean out or replace the nozzle.
Usually the pump has gone belly up. Replace it as described in section 5-4.
If the machine is not pumping out water because the coupling has come off the pump, check the pump for jamming. See section 5-4.
SYMPTOM: SLOW OR NO
AGITATE AND/OR SPIN.
When diagnosing this problem, keep in mind that the pump is coupled directly to the motor; it does not receive power through the clutch. Only the transmission receives power through the clutch and belt. Therefore, a locked transmission will not stop the motor from turning, but a locked pump will.
1) If NOTHING on the machine works, and it's not even making any noise, check the power supply. Also check the electrical components in section 2-6.
NOTE: In some models, the lid switch stops the machine completely. In others, only the spin cycle is interlocked, and the machine will still fill and agitate with the lid raised. Check your wiring diagram.
2) The belt may be broken or loose. Check as described in section 2-5(a) and tighten or replace as described in section 5-10.
3) Often a sock or something has jammed in the pump. This symptom is often accompanied by a strong burning smell. You will also hear the motor trying to start, then tripping off by the motor overload switch, because it is being stalled by the pump. An additional confirmation of this diagnosis is that if you look at the pump coupling while the motor is trying to start, it will be twisted tightly. See section 5-4.
4) If the transmission pulley is turning, but either agitate or spin or both are not working, the transmission is bad. Replace as described in section 5-13.
If the pump is turning, but the transmission drive pulley is not turning, stop the washer and disconnect power. Try turning the transmission pulley by hand, in both directions. If the transmission pulley will not turn in one or both directions, the transmission needs to be replaced. See section 5-13.
If the transmission pulley turns fairly easily by hand, but the clutch drum is turning slowly or not at all under motor power, the clutch may be bad. Usually there will be a loud rattling noise. See section 5-11.
5) The motor or starting solenoid may be burnt out. Remember that the motor may start in one direction, but not in the other. Usually you will hear the motor buzzing as it tries to start, then dropping out on the overload. Check as described in section 5-12.
6) If the washer spins but does not agitate, check the agitator splines. Section 5-5.
7) If you have a two-speed machine and the slow (gentle) speed is not working, the clutch solenoid may not be working. See section 5-11.
SYMPTOM: BASKET SPINS (CLOCKWISE) WHILE AGITATING.
The transmission needs to be replaced. See section 5-13.
SYMPTOM: OIL LEAKS
A little bit of oil leakage is normal. If oil is leaking so badly that it is slinging off the transmission drive pulley and getting around the inside of the cabinet, you will need to replace the transmission as described in section 5-13.
SYMPTOM: EXCESSIVE
NOISE OR VIBRATION
A whining or loud clattering noise is usually a worn clutch. See section 5-11.
If the machine makes a squeaking noise, especially during the spin cycle, the snubbers are probably worn out. This is especially true if the machine has difficulty balancing during spin, even after you redistribute the clothes. Replace the snubber blocks as described in section 5-14.
A vast majority of GE-built washers use the pump shown in figure GE-4. A few less-expensive models used a non-recirculating pump with only two hose connections.

The pump is connected directly to the motor through a rubber/fabric flexible coupling (Figure GE-5.) The pump coupling is connected to both by a round clamp at each end. When installing a new coupling, do not remove the staples that hold it in shape. Also, put the gaps in the clamps directly over the gaps in the coupling.

If the washing machine pump seal is leaking, you will see water weeping (or the tracks of a water weep) from the hole shown in figure GE-4.
There are no special tricks to replacing a GE pump. First, drain the tub as described in section 1-6. Disconnect the pump coupling at the TOP end, then the remove the three pump mounting screws. Have a bucket ready to catch water, and remove the four pump hoses.
Installation is the opposite of removal.
If something is jamming the pump, the pump coupling will be twisted tightly while the motor is trying to start. Check for jams as described in section 2-3.
If the pump is not turning freely, but you cannot find a jam, replace the pump.
If the coupling has come off the pump, make sure you check that the pump is turning freely.
Most GE-designed washing machine agitators are not fastened to the shaft by any screws or bolts. To remove, simply tug upwards on the bottom of the agitator. There are exceptions; see "handwash" agitators below.
If you find that you cannot remove the agitator by pulling on it, try tapping the top of the agitator gently with a rubber or wooden mallet. If you still cannot remove the agitator, pry off the plastic cap in the center. Then cut out the little piece of plastic in the center of the hub with a knife; this will expose the top of the agitator shaft. (Figure GE-6) Hit it with a little WD-40 to loosen it.
GE-designed agitators have a removable rubber spline insert that connects the agitator to the transmission shaft splines (Figure GE-6.) If the splines are stripped, you can replace the whole agitator, or just the rubber spline insert.

To remove the insert, remove the plastic cap and cut out the center plastic piece as described above. Push out the old spline insert (it can be difficult.) To replace, put the new insert onto the top of the transmission shaft and push the agitator down onto it.
Hotpoint and JC Penney have a "handwash" agitator on some designs. The "handwash" agitator is actually a small agitator that fits inside the larger, main agitator.
The "handwash" agitator has a small screw underneath the metal disc on top of the agitator; make sure you remove it before trying to pull up on the "handwash" agitator. There are locking tabs that you must twist to remove the larger agitator from the smaller one.
Once the screw is removed, the "handwash" agitator should lift out easily. If not, tap with a rubber mallet a described above, or shoot some WD-40 into the screw hole.
To access the transmission boot or replace tub fittings, you must remove the basket.

Drain the tub, raise the cabinet top, and remove the agitator as described in section 5-5. Remove the recirculation nozzle (figure GE-7) by simply pulling it straight out. Remove the agitator bushing by pressing on the spring-loaded tab. Beneath the agitator bushing are three basket mounting bolts. (Figure GE-8.) Remove the three bolts with a 1/2-inch 12-point socket or box wrench and lift out the basket.

The tub boot and all tub fittings will now be visible. (Figure GE-9) IF THE TUB BOOT IS NOT LEAKING, DO NOT REMOVE IT. If you need to remove it, it is simply clamped to the transmission top and to a lip on the tub by two big round clamps. If it has simply shaken loose and not torn, you can just clamp the old one back in place, but you'd better check the snubber blocks as described in section 5-14 to try to find out why it shook loose in the first place. Re-assembly is the opposite of dis-assembly.

Testing the timer is described in section 2-6(c).
To test or remove the timer, remove the console as described in section 5-2. If the timer dial prevents you from removing the timer, pull off the spring clip from behind the timer knob as shown in figure GE-10. Mark the timer wires as you remove them, or better yet, pull the wires off the old timer and put them directly on the new one, one at a time.

GE washing machines used two basic timer designs over the years. One used a metal housing. The other design is known as a "clamshell" timer because of the curved shape of its plastic housing. Both are rebuildable, though not by a novice. If your timer is defective, take it to your parts dealer and ask for a rebuilt.
The lid switch is located beneath the cabinet top, towards the right rear of the washer. It is a simple, mechanically-activated switch. Test with an ohmmeter and replace if defective.
The water level switch is located beneath the console. GE washers used several different wiring schemes, so refer to section 2-6(b) and compare with figure GE-11 to determine which terminals to test. If the switch is bad, replace it.

Remove power from the washer and remove the back panel as described in section 5-2.
To tension the belt, loosen the three motor mounting bolts on the underside of the motor mounting plate. Proper tension is when the belt can be deflected approximately 1/2-inch, midway between the motor and transmission pulleys, with your fingers. Use your hands; you do not need any extra leverage on the motor to set proper belt tension.
To replace the belt, simply remove the upper pump coupling and install the new belt.
GE washers use two different clutches (Figure GE-12.)
The two-speed clutch can be identified by the solenoid that activates the slow speed. It also has a larger outer clutch drum. If the slow (gentle) agitator speed is not working, test the solenoid coil for continuity. If it has no continuity, replace by removing the screw on the underside of the coil.
I do not recommend the novice trying to rebuild a two-speed clutch. They are complex assemblies; difficult to disassemble, assemble, and adjust.

If you suspect your two-speed clutch assembly is bad, remove the motor and clutch assembly from the machine and take the assembly to a rebuilder.
On the other hand, a single-speed clutch is a relatively simple assembly. To service the single-speed clutch, first remove power from the washer and remove the back panel. Disconnect the pump coupling, loosen the motor mounting bolts, and remove the drive belt. Disconnect the motor wiring at the terminal block. Remove the motor mounting bolts (be careful; the motor is heavy!) and remove the motor and clutch assembly from the washer.
There is a roll pin in the pump coupling plate on top of the clutch pulley. Drive it out with a straight punch. (Figure GE-13.) Lift off the pump coupling plate.

Lift off the clutch drum. If it does not lift off easily, tap lightly on the motor shaft extension with a hammer. If that doesn't get it off, you will need to use a wheel puller and horseshoe collar.
CAUTION:If you use a wheel puller to remove the clutch drum, do not pull on the skirt of the drum. Use a horseshoe collar (Figure GE-14) to pull on the drive pulley.

See figure GE-15 for disassembly of the clutch components. Inspect the shoes and clutch drum for excessive wear. If you're not sure if the shoes can be re-used, ask your appliance parts dealer, or simply replace them. They're cheap insurance against future problems.
Normally you will not need to remove the shaft extension, but do inspect it, and replace if worn or damaged.
Reassembly is the opposite of disassembly. To get the roll pin in, line up the holes and stick in a nail to keep the holes aligned. Then drive the pin in from the opposite side as the nail.

If you hear the motor trying to start, but dropping out on the motor overload, and the pump coupling is not twisted when the motor is trying to start, either the relay is defective or a motor winding is burnt out. Test as described below.
RELAY
GE washers use a separate relay. Remove the back panel. As you look at the back of the machine, you will find the relay towards the upper left side of the machine. (Figure GE-16)

To test the relay, first remove power from the machine. Mark the relay wires and remove them. Remove the relay from the machine.
With your ohmmeter set on Rx1, test between the terminals marked "M" and "LS." You should see good continuity.
Test between the terminals marked "L" and "S." You should see no continuity.
Turn the relay UPSIDE DOWN and test again between the "L" and "S" terminals. You should now see good continuity.
If you do not get the above readings, replace the relay. It is very important to get the right relay; it matches the motor that's installed.
MOTOR
If the relay is not bad, the motor is. Replace the motor and relay as a pair. Make sure you get the right motor for your machine. The motor mount is held in place by three nuts.
To replace the transmission, first remove the basket and tub boot as described in section 5-6.
Remove the six transmission mounting bolts shown in figure GE-17. Slide the transmission towards the right rear of the washer, and reach under the transmission to make sure the drive belt has disengaged from it. Lift out the transmission (be careful; it is heavy.)

The transmission can be rebuilt, but not by the novice. Rebuilt GE washing machine transmissions are a standard item at most parts stores, and they are not terribly expensive. Make sure you get the right shaft length.
Replacement is the opposite of removal. Lower the transmission into place, and slip the drive belt on. Locate the right rear bolt loosely in its hole, then the left front bolt, then the other four.
Install the boot, basket, and agitator. As a final step, remove the back from the washer and make sure the belt is seated properly.
There are eight friction pads, commonly known as snubber blocks, which help to prevent vibration during the spin cycle. There are two in each corner of the machine. (Figure GE-18)
These can wear out, causing excessive vibration and a squeaking noise. Often they will be missing when you look for them. Lift the spring and replace them. Be careful not to catch your fingers under the spring.

Please share our .