Washing Machine Repair
Appliance companies, like most other major industries, have their share of takeovers, buyouts and cross-brand agreements.
In some cases, the same washer machine design is marketed under several different brand names or model names.
Other manufacturers merged or bought other companies, and put out several different designs under the same brand name. The different designs are differentiated by being a different "model" or "series."
Confusing the issue even more, some manufacturers "private label" their machines for large department stores. Such as Sears' Kenmore and Montgomery Ward's Signature machines.
Check the following list to determine if you have one of these "cross-branded" machines. If so, your repair info will be in the chapter for that design.
TO PROPERLY IDENTIFY YOUR WASHER,
PLEASE BE SURE TO READ "THE BIG FIVE,"
STARTING IN SECTION 1-1(a) BELOW!!!
ADMIRAL: Maytag Herrin
CROSLEY: Maytag Herrin
FRANKLIN: Frigidaire
GIBSON: Frigidaire
HOTPOINT: General Electric
INGLIS: Whirlpool
J.C. PENNEY: General Electric
KELVINATOR: Frigidaire
KENMORE: Whirlpool
KITCHENAID: Whirlpool
MAGIC CHEF: Maytag Herrin
MONTGOMERY WARD: Maytag Herrin or Frigidaire
PENNCREST: General Electric
RCA: General Electric
ROPER: Whirlpool
SIGNATURE: Maytag Herrin or Frigidaire
SPEED QUEEN: Amana
WHITE-WESTINGHOUSE: Frigidaire
Following are the primary domestic manufacturers of the machines sold in the USA and Canada. WHIRLPOOL: From the 50's into the early 80's, Whirlpool used essentially the same old, dependable, bullet-proof design. They are known in the parts houses as "Whirlpool belt-drive" washing machine models.
In the early 80's, Whirlpool began manufacturing their "Design 2000" washers. These are known in the parts houses as "Whirlpool direct drive" models.
Both are covered in this book, in Chapters 3 & 4 with full instructions and diagrams of the whirlpool washer parts that may need replacing.
In the '90's, Whirlpool purchased KitchenAid. KitchenAid and Roper machines are direct-drive.
In 2006, Whirlpool purchased Maytag.
Kenmore washers are, and always have been, private-labelled "Whirlpool" washers, both belt-drive and direct-drive. GENERAL ELECTRIC: Until 1995, GE had made the same old fairly reliable design for 30 years. These machines were sold as GE, Hotpoint, and "private-labelled" as JC Penney and Penncrest brands.
In 1995, GE started making a new "front access" washing machine. Unlike the old model, there is no rear access panel on these machines; all the machine internals are accessed through the front. These machines were sold as GE, Hotpoint, and RCA machines.
Both the "old-style" and the newer "front-access" GE machine designs are covered in this manual, in chapters 5 and 6.
FRIGIDAIRE: In the ('70's? "80's?) Westinghouse became White Consolidated Industries (WCI) and started buying up a whole bunch of different brands, including Frigidaire, Gibson, Kelvinator, and others. WCI's machines were sold under these original brand names, as well as Westinghouse and White-Westinghouse brands. Frankly, these washers were pretty poorly designed, displaying major oil and water leakage within five years.
In the '90's, WCI was bought by Swedish giant Electrolux, who changed the company name back to the Frigidaire Home Products Company. They appear to have redesigned virtually their entire lineup, and in my never-to-be-humble opinion, the new designs are one heckuva lot better than the old designs.
They are still marketing products under Frigidaire and Gibson; if you look at the model number, it will start with a G or an F. However, the design is the same.
Some Montgomery Ward / Signature machines were manufactured by WCI, some by Norge (see Maytag.) AMANA: Same company as Speed Queen for awhile. Maytag has recently purchased Amana, but as of this writing, it has not shown up as differences in their product line.
Pre-1980 2-belt, 3-belt and "fluid drive" machines are all but extinct, and difficult and very expensive to get parts for, and thus are not covered in this manual.
MAYTAG: Maytag has two different top-loading washers wearing the Maytag brand name.
In 2006, Whirlpool purchased Maytag.
"Performa" and "Atlantis" machines are the result of the purchase of the Norge and Crosley line (and design) by Maytag. Norge was the original designer of these machines. They are also known as Maytag "Herrin" machines in the parts houses. They have continued to manufacture these "Herrin" machines as Maytag "Performa" models and high-end Crosley brand machines, but they have gone through a LOT of evolution.
Some of the older Montgomery Ward / Signature machines are Norge machines.
The so-called Maytag "old-style" washers, or "orbital" machines, are virtually the same old reliable design that Maytag has been using for 40-plus years now. They are also known in the parts houses as Maytag "Newton" machines. The orbital machine, manufactured since the late '80's, is a "Newton" machine with a redesigned "orbital" transmission with only six moving parts. The "orbital" transmissions are interchangeable with the pre-1980's so-called "counterweight" transmissions. Unlike the counterweight machine, the gearing in the orbital transmission can be serviced without removing the transmission from the machine.
Find yourself a good appliance parts dealer. You can find them in the Yellow Pages under the following headings:
- APPLIANCES, HOUSEHOLD, MAJOR
- APPLIANCES, PARTS AND SUPPLIES
- WASHING MACHINES, DOMESTIC
- APPLIANCES, HOUSEHOLD, REPAIR AND SERVICE
Call a few of them and ask if they are a repair service, or if they sell washing machine parts, or both. Ask them if they offer free advice with the parts they sell. (Occasionally, stores that offer parts and service will not want to give you advice.) Often, the parts counter men are ex-technicians who got tired of the pressure of going into peoples' houses and selling a job. They can be your best friends; however, you don't want to badger them with TOO many questions, so know your basics before you start asking questions.
Some parts houses may offer service too. Be careful! They may try to talk you out of even trying to fix your own washer. They'll tell you it's too complicated, then in the same breath, "guide" you to their service department. Who are you gonna believe, me or them? Not all service/parts places are this way, however. If they genuinely try to help you fix it yourself and you find that you can't fix the problem, they may be a really good place to look for service.
When you go into the store, have ready your make, model and serial number from the nameplate of the washer.
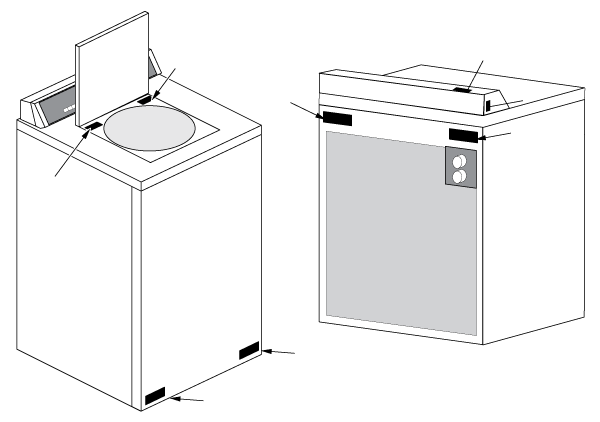
The metal nameplate information is usually found in one of the places shown in Figure 1-1:
A) Along the bottom panel; on the left or right corner.
B) Inside or underneath the lid.
C) Somewhere on the back of the washer.
D) Side or top of the console
If all else fails, check the original papers that came with your washer when it was new. They should contain the model number SOMEWHERE.
If you have absolutely NO information about the washer anywhere, make sure you bring your old part to the parts store with you. Sometimes they can match an old part by looks or by part number.
The tools that you may need (depending on the diagnosis) are listed below. Some are optional. The reason for the option is explained.
For certain washing machine repairs, you will need a special tool. These are inexpensively available from your appliance parts dealer. They are listed in this book as needed.
SCREWDRIVERS: Both flat and phillips head; two or three different sizes of each. It is best to have at least a stubby, 4″ and 6″ sizes.
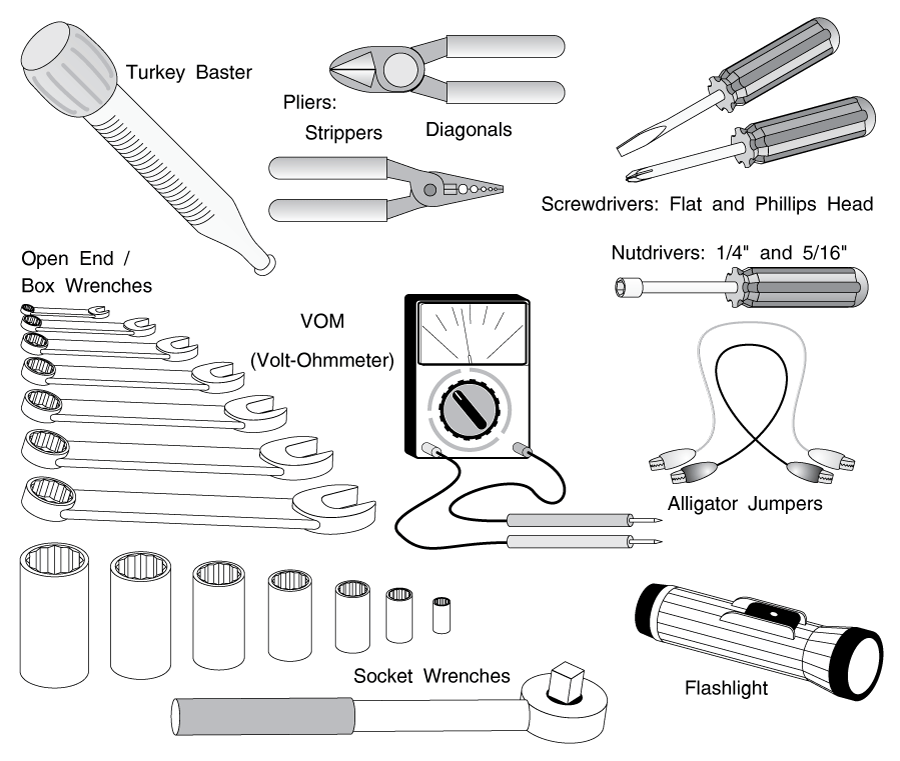
NUTDRIVERS: You will need at least a 1/4″ and a 5/16″ nut driver. 4″ or 6″ ones should suffice, but it's better to have stubbies, too.
ELECTRICAL PLIERS or STRIPPERS and DIAGONAL CUTTING PLIERS: For cutting and stripping small electrical wire.
BUTT CONNECTORS, CRIMPERS, WIRE NUTS AND ELECTRICAL TAPE: For splicing small wire.
VOM(VOLT-OHM METER): For testing circuits. If you do not have one, get one. An inexpensive one will suffice, as
long as it has both "A.C. Voltage" and "Resistance" (i.e. R x 1, R x 10, etc.) settings on the dial. It will do for our purposes. If you are inexperienced in using one, get an analog (pointer) type (as opposed to a digital.)
SYRINGE TYPE TURKEY BASTER: For cleaning fill hose and fill solenoid valve strainer screens.
ALLIGATOR JUMPERS (sometimes called a "CHEATER" or "CHEATER WIRE"): small gauge (14-16 gauge or so) and about 12 to 18 inches long; for testing electrical circuits. Available at your local electronics store. Cost: a few bucks for 4 or 5 of them.
OPEN END/BOX WRENCHES
SOCKET WRENCHES
FLASHLIGHT
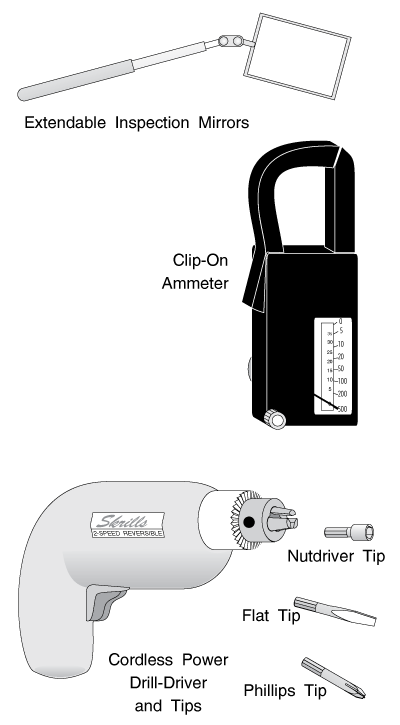
OPTIONAL TOOLS
(Figure 1-3)
SNAP-AROUND AMMETER: For determining if electrical components are energized. Quite useful; but a bit expensive, and there are alternate methods. If you have one, use it; otherwise, don't bother getting one.
EXTENDABLE INSPECTION MIRROR: For seeing difficult places beneath the washer and behind panels.
CORDLESS POWER SCREWDRIVER OR DRILL/DRIVER WITH MAGNETIC SCREWDRIVER AND NUTDRIVER TIPS: For pulling off panels held in place by many screws. It can save you lots of time and hassle.
1) Always de-energize (pull the plug or trip the breaker on) any washer that you're disassembling. If you need to re-energize the washer to perform a test, make sure any bare wires or terminals are taped or insulated. Energize the unit only long enough to perform whatever test you're performing, then disconnect the power again.
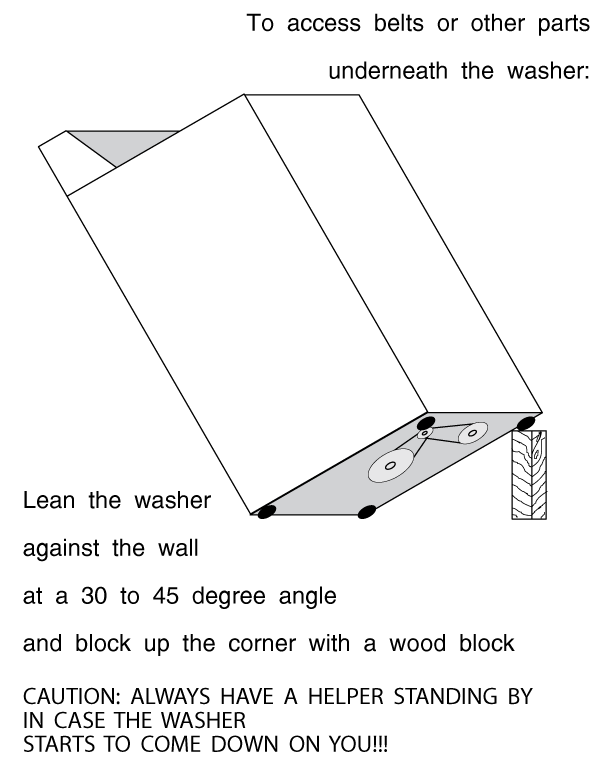
2) To work underneath the washer sometimes requires leaning the washer back against the wall at a 30- to 45-degree angle. When you do, always block up one corner of the washer as shown in Figure 1-7. NEVER DO THIS ALONE! Always have someone standing by to help you while you work beneath the washer, in case it comes down on you.
3) If the manual advocates replacing the part, REPLACE IT!! You might find, say, a solenoid that has jammed for no apparent reason. Sometimes you can clean it out and lubricate it, and get it going again. The key words here are apparent reason. There is a reason that it stopped--you can bet on it--and if you get it going and re-install it, you are running a very high risk that it will stop again. If that happens, you will have to start repairing your washer all over again. It may only act up when it is hot, or it may be bent slightly...there are a hundred different "what if's." Very few of the parts mentioned in this book will cost you over ten or twenty dollars. Replace the part.
4) If you must lay the washer over on its side, front or back, first make sure that you are not going to break anything off, such as a drain hose or fill valve. Lay an old blanket on the floor to protect the floor and the finish of the washer. And for goodness' sake, make sure you drain the thing completely first!
5) Always replace the green (ground) leads when you remove an electrical component. They're there for a reason. And NEVER EVER remove the third (ground) prong in the main power plug!
6) When opening the washer cabinet or console, remember that the sheet metal parts are have very sharp edges. Wear gloves, and be careful not to cut your hands!
Following are a few hard-earned pearls of wisdom:
1) When testing for your power supply from a wall outlet, plug in a small appliance such as a shaver or blow dryer. If you're not getting full power out of the outlet, you'll know it right away.
2) If you just can't get that agitator unstuck, your appliance parts dealer has a device called an Agi-Tamer for just such an occurrence. It's basically a heavy-duty rubber balloon that fits under the agitator, and uses water pressure to lift it upwards from underneath.
3) If you need to drain the tub (usually because your pump isn't pumping out) most folks try to bail it out. That's a wet, messy, yucky job, and not very thorough.
Try this instead: use your garden hose as a siphon.
However, when you do, another problem arises: did you ever try to suck a charge of wash water through a fifty-foot garden hose? If you can, you've got one heckuva set of lungs. And what happens when that nice, week-old dirty wash water reaches your mouth?
You guessed it: there's a better way.
What's the point in sucking the water through the hose? To get rid of the air in the hose, right? Well, instead of using lung suction to do that, let's use hose pressure.
Leave your garden hose connected to the faucet, and put the other end of it in the washer tub. Turn the faucet on for a few seconds, until it stops bubbling in the tub. The air is gone now, right?
Kink the garden hose so you don't lose the water charge, and disconnect it from the faucet. When you're sure the faucet end of the hose is lower than the bottom of the washer tub, release the kink in the hose. The tub will drain, almost completely, in just a few minutes. No muss, no fuss.
Many home handymen are very intimidated by electricity. It's true that diagnosing and repairing electrical circuits requires a bit more care than most operations, due to the danger of getting shocked. But there is no mystery or voodoo about the things we'll be doing. Remember the rule in section 1-4 (1); while you are working on a circuit, energize the circuit only long enough to perform whatever test you're performing, then take the power back off it to perform the repair. You need not be concerned with any theory, like what an ohm is, or what a volt is. You will only need to be able to set the VOM onto the right scale, touch the test leads to the right place and read the meter.
In using the VOM (Volt-Ohm Meter) for our purposes, the two test leads are always plugged into the "+" and "-" holes on the VOM. (Some VOMs have more than two holes.)
Set the dial of the VOM on the lowest VAC scale (A.C. Voltage) over 120 volts. For example, if there's a 50 setting and a 250 setting on the VAC dial, use the 250 scale, because 250 is the lowest setting over 120 volts.
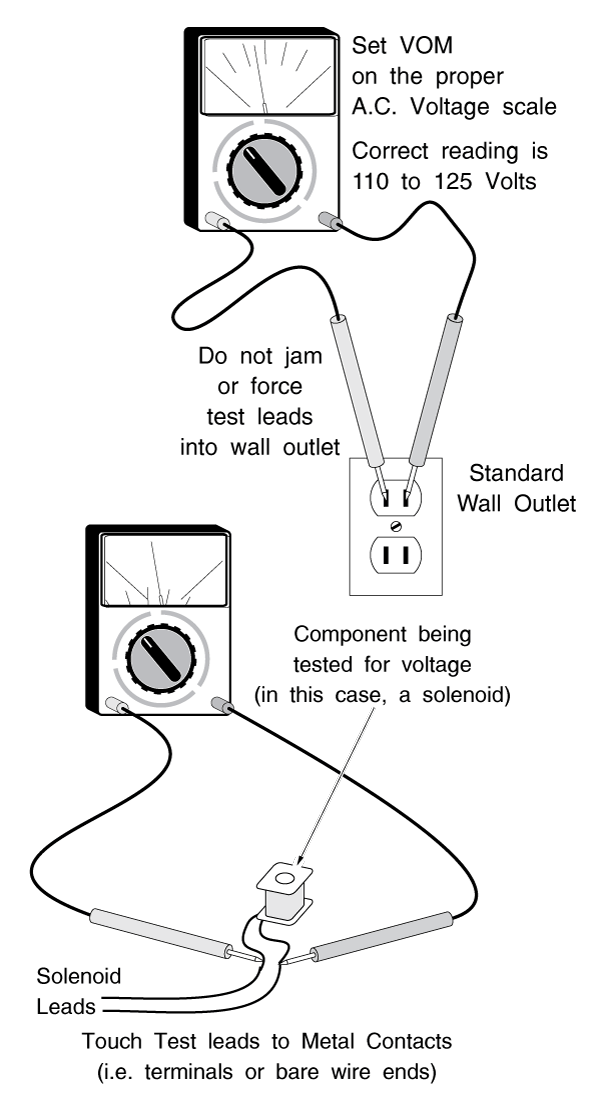
Touch the two test leads to the two metal contacts of a live power source, like a wall outlet or the terminals of the motor that you're testing for voltage. (Do not jam the test leads into a wall outlet!) If you are getting power through the VOM, the meter will jump up and steady on a reading. You may have to convert the scale in your head. For example, if you're using the 250 volt dial setting and the meter has a "25" scale, simply divide by 10; 120 volts would be "12" on the meter.
(Figure 1-5)
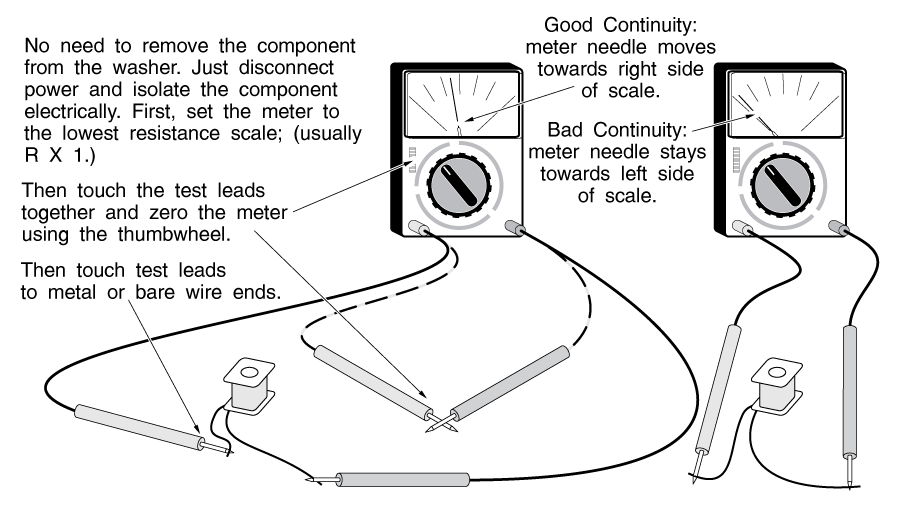
Don't let the word "continuity" scare you. It's derived from the word "continuous." In an electrical circuit, electricity has to flow from a power source back to that power source. If there is any break in the circuit, it is not continuous, and it has no continuity. "Good" continuity means that there is no break in the circuit.
For example, if you were testing a solenoid to see if it was burned out, you would try putting a small amount of power through the solenoid. If it was burned out, there would be a break in the circuit, the electricity wouldn't flow, and your meter would show no continuity.
That is what the resistance part of your VOM does; it provides a small electrical current (using batteries within the VOM) and measures how fast the current is flowing. For our purposes, it doesn't matter how fast the current is flowing
To use your VOM to test continuity, set the dial on (resistance) R x 1, or whatever the lowest setting is. Touch the metal parts of the test leads together and read the meter. It should peg the meter all the way on the right side of the scale, towards "0" on the meter's "resistance" scale. If the meter does not read zero resistance, adjust the thumbwheel on the front of the VOM until it does read zero. If you cannot get the meter to read zero, the battery in the VOM is low; replace it.
If you are testing, say, a solenoid, first make sure that the solenoid leads are not connected to anything, especially a power source. If the solenoid's leads are still connected to something, you may get a reading through that something. If there is still live power on the item you're testing for continuity, you will burn out your VOM instantly and possibly shock yourself.
Touch the two test leads to the two bare wire ends or terminals of the solenoid. You can touch the ends of the wires and test leads with your hands if necessary to get better contact. The voltage that the VOM batteries put out is very low, and you will not be shocked. If there is NO continuity, the meter won't move. If there is GOOD continuity, the meter will move toward the right side of the scale and steady on a reading. This is the resistance reading and it doesn't concern us; we only care that we show good continuity. If the meter moves only very little and stays towards the left side of the scale, that's BAD continuity; the solenoid is no good.
If you are testing a switch, you will show little or no resistance (good continuity) when the switch is closed, and NO continuity when the switch is open.
If you do not, the switch is bad.
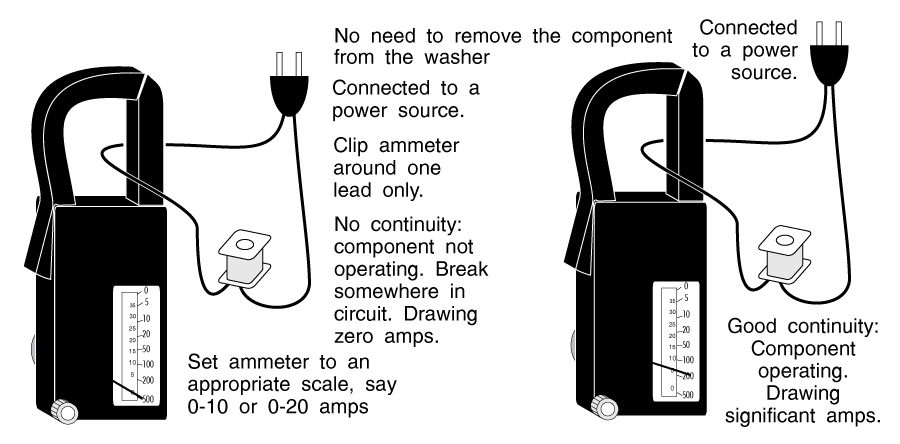
Ammeters are a little bit more complex to explain without going into a lot of electrical theory. If you own an ammeter, you probably already know how to use it.
If you don't, don't get one. Ammeters are expensive. And for our purposes, there are other ways to determine what an ammeter tests for. If you don't own one, skip this section.
For our purposes, ammeters are simply a way of testing for continuity without having to cut into the system or to disconnect power from whatever it is we're testing.
Ammeters measure the current in amps flowing through a wire.
The greater the current that's flowing through a wire, the greater the density of the magnetic field it produces around the wire. The ammeter simply measures the strength of this magnetic field, and thus the amount of current, flowing through the wire. To determine continuity, for our purposes, we can simply isolate the component that we're testing (so we do not accidentally measure the current going through any other components) and see if there's any current flow.
To use your ammeter, first make sure that it's on an appropriate scale (0 to 10 or 20 amps will do). Isolate a wire leading directly to the component you're testing. Put the ammeter loop around that wire and read the meter. (Figure 1-6)
Please share our .