Dishwasher Pump And Motor Problems
Okay, you've diagnosed out every other possibility, and it just has to be the pump and/or motor that's gone haywire. How do we get into it? How do we disassemble it? Do we need to remove the unit from its space under the counter?
These are the questions this chapter answers.
In some dishwasher machines it is easier pull the whole machine out from under the kitchen counter to get to the pump or the motor. Specifically: GE/Hotpoint, Thermador/Waste King, WCI/Westinghouse, and late model Whirlpool.
In yet other machines, the pump and motor can both be easily removed with the machine in place. Specifically: Whirlpool Vertical Machines, Maytag, ISE/Kitchenaid, D&M.
Note that D&M, Kitchenaid and Thermador pumps can easily be rebuilt with the machine in place, but getting the motor out can be a bit persnickety. Give it a try, but if you have trouble getting the motor out or back in, yank the machine.
Most dishwasher problems can be diagnosed and fixed with the machine in place. However, some problems cannot. In either case, you'll usually need to get to the components beneath the tub. This section describes cabinet access and removal of a built-in machine.
Most built-in models are built with removable kickplates as shown in Figure 5-A. Removing this kickplate as shown allows access to the fill valve, electrical junction box, and drive motor. Most built-in models are also fastened to the countertop by two screws at the front of the machine; open the door to access these screws.

To get to the timer, selector switches, detergent dispenser trigger, wiring diagram or anything else located inside the door, remove the screws holding on the front panel as shown in figure 5-B.

Before you can remove the entire dishwasher from its mounting location, you must disconnect three things: the hot water fill line, the water drain line, and the electrical power supply.
Disconnect the electrical connection first. It is usually pretty easy. Though some are hard-wired into the wall, most dishwashers are plugged into a regular outlet beneath the kitchen sink. If you are unlucky enough to have one that's hard-wired, you must shut off the breaker and disconnect the main power cord at the junction box. This box is usually located just inside the kickplate on the front corner of the machine (see Figure 5-C).

NOTE: If your machine is plugged in beneath the sink, make sure you get the plug back into the correct outlet. Usually the other outlet beneath the sink is for the garbage disposal, which is wired through a switch near the sink. Normally the garbage disposal switch is off, so there is no power to its outlet; if you plug the dishwasher into that outlet, it will not run at all. I cannot begin to tell you how many times I've been called to fix a "dead" dishwasher, when the only problem was that it was plugged into the wrong outlet. (At 30-50 bucks per service call, that's an expensive mistake)
The drain line is also usually pretty easy to disconnect. It is normally connected to the sink drain by flexible rubber hose and hose clamps. But don't forget that there may still be water in the pump and drain line, even if the tub is empty! Have a shallow pan or an old towel standing by (one that will fit beneath the pump drain connection) to catch any water left in the tub or drain line.
The fill line is another story. It is usually copper-piped right up to the fill valve. This makes it less likely to fail and flood the kitchen, but it can also make it more difficult to remove and install. If you disconnect the copper line from the valve, you may have to cut it shorter to get rid of the old brass connection fittings. Make sure you have enough copper line remaining to re-connect it to the valve. A better alternative (though it's not always possible) may be to leave the copper line connected to the valve, and disconnect the valve from the rest of the dishwasher. Of course, if you're replacing the valve, it doesn't really matter; you've got to disconnect the copper line, anyway.
SPECIFIC MODELS MAY VARY SLIGHTLY,
BUT YOUR MACHINE SHOULD LOOK VERY SIMILAR TO ONE OF THESE.
PLEASE NOTE, HOWEVER, THAT THERE WERE MANY VARIATIONS MADE
OF EACH BASIC DESIGN.
THERE MAY BE PARTS PRESENT ON YOUR MACHINE
THAT ARE NOT ON THESE ILLUSTRATIONS.
THEREFORE, WHEN DISASSEMBLING YOUR MACHINE,
CAREFULLY NOTE HOW ALL PARTS ARE INSTALLED
AND IN WHAT ORDER THEY COME OFF.
TECH NOTES
Vertical Whirlpool machines are direct reversing, two-impeller machines.
The whole pump and motor unit are easily removed with the machine in place.
The pump can be rebuilt. Your appliance parts dealer has impeller and seal kits. However, if the top motor bearing is damaged, the whole pump and motor unit must be replaced. When you get the pump disassembled, turn the motor by hand. If it's at all sticky or gritty, replace the motor.
If you have a bladder-top design, it has been replaced with a re-designed system. A new pump and motor unit will come with the new design.
NOTE: Some of these machines are starting to get pretty old. If the porcelain is chipping off the tub, then rust will continue to get into the pump seals and ruin them. You may just want to think about replacing the machine.
LATE-MODEL KITCHENAID machines are virtually the same as pictured here, with a few small differences. Kitchenaid models have four spray arms. The wash pump cover and separator are somewhat different, and are removed with a torx bit. There is also no removable valve in the side of the separator.
TECH TIPS
Unplug the machine and remove the kickplate. Disconnect the motor wiring harness plug. Disconnect the drain hose from the pump unit and be prepared to catch any water left in the pump. Unscrew the drain check valve from the pump body. Twist the pump unit retaining blocks inward and lift out the whole pump and motor unit. It might be sticky; you can rock it a bit to loosen it. Do NOT pry the seal or remove the big seal from the pump body.
Installation is the opposite of removal. Make sure you line up the pump drain port with the notch in the tub. The seal may not want to go into the tub; smear it with a very thin coat of vegetable oil (VERY thin!) to help it slide into place. Make sure it is centered and seated evenly. When you get the pump/motor unit back into place and hooked up, pour a gallon of water into the tub before starting the machine. Do not run the pump dry!!!

TECH NOTES
Late-model Whirlpool (sidewinders) are direct-reversing horizontal-shaft machines. When the motor reverses, the drain valve automatically opens to drain the tub.
You usually need to remove these machines from under the kitchen counter to remove the pump and motor unit.
Your appliance parts dealer has a seal kit to rebuild the pump.
NOTE: These machines may freeze up from non-use. If your machine is frozen, disassemble the pump unit and replace the impeller seal and bearing.
TECH TIPS
These are very straightforward machines to disassemble. Disconnect the motor harness, all hoses, the motor mount and the pump suction inlet. Have a shallow pan or an old towel standing by to catch any water when you remove the hoses.
The only trick is that the screws holding it together are Torx-head screws, so you need a size 20 Torx-head screwdriver.
To get the impeller and seal out, unscrew the pump disk from the pump inlet with a pair of pliers. Don't forget to remove the drain cover and check the rubber diaphragm.
When installing the motor into the pump housing, make sure the flat on the motor shaft matches the flat in the impeller.
When you get the pump/motor unit back into place and hooked up, pour a gallon of water into the tub before starting the machine. Do not run the pump dry!!!

TECH NOTES
General Electric and Hotpoint machines are single-direction, horizontal-shaft machines. Older machines have a round motor, newer machines have a square-ish motor with an extermal capacitor.
To change from wash mode to drain mode, a solenoid-operated flapper valve closes off the spray arms and opens the drain port.
You usually need to remove the machine from beneath the countertop to remove the pump and motor unit.
If the motor is not starting, it may be stuck. Sometimes the seal just gets a little dried out and sticky. You may be able to free it by hand. Unplug the machine and remove the kickplate. Try turning the motor fan blades by hand with the motor in place.
If you cannot free the motor, replace the seal. In newer machines (with the square motor) the carbon seal is not glued into place, and can come loose and catch the rubber seal. You can glue the carbon seal in place with a little RTV.
The pump on these machines can be rebuilt. Your appliance parts dealer a seal kit available. There is also a rebuilt pump and motor unit generally available; it is a LOT faster and easier just to swap out the pump if you can afford it.
TECH NOTES
These are pretty straightforward machines to disassemble. Unplug the machine. Have a shallow pan standing by to catch any water left in the pump and disconnect all hoses from the pump. Disconnect the motor leads, the motor mount and the pump suction inlet and discharge.
A macerator is located outside the pump screen. This macerator chops up bits of food and debris before it enters the pump. Two different kinds of macerators were used; a blade-type, and a wire-type. If you have a blade-type, hold the motor fan blades and unscrew the macerator from the impeller. If you have a wire-type, there is no need to remove it yet.
There are tabs molded into the suction port nut for removal. Using the flat side of a file to turn the nut, unscrew the suction port nut from the pump body. If you have a metal suction screen, this will be difficult. Loosen it by grabbing the metal suction screen and yanking it out with a pair of needlenose pliers. This will destroy the screen, but it's cheap to replace, and it will loosen the nut. Remove the plastic ring and the metal wear ring. Note how they come out for re-installation.
NOTE: The suction port nut has left-hand threads! Turn it clockwise to remove it!
Hold the motor fan blades and unscrew the impeller. Hold the impeller with a pair of pliers (careful not to damage the threads unless you are replacing it) and turn the motor fan blades.
Remove the pump body from the motor and knock out the pump shaft seal from the outside.
Assembly is the opposite of disassembly. Make sure the lip on the metal wear ring points towards the impeller. Don't forget that the suction valve nut has a left-hand thread; turn counter-clockwise to install.
Feel the action of the flapper valve. If it is sticky or leaking, replace the flapper valve shaft seal.
When you get the pump/motor unit back into place and hooked up, pour a gallon of water into the tub before starting the machine. Do not run the pump dry!!!

TECH NOTES
These are vertical-shaft machines, direct reversing, with two-impellers. Both impellers are used during the wash cycle; the lower impeller feeds the upper spray arm, and vice-versa. During the drain cycle, the motor reverses and the lower impeller pumps out the tub.
Your appliance parts dealer has an impeller and seal kit for these machines.
OLDER MODELS: The pump is disassembled in place, without removing the motor.
Once the pump has been disassembled, the motor can be removed with the machine in place, but it can be a difficult job. The screws are hard to get to. Try it, but if you have too much trouble, pull out the machine.
LATER MODEL: These machines have a split collar on the underside of the tub, atop the motor. The pump and motor can be lifted out as a unit and rebuilt on a bench.
TECH TIPS
These are pretty straightforward machines to tear down and rebuild. Note carefully how everything comes off and in what order.
OLDER MODELS: Unplug the machine and disconnect the motor harness. Have a shallow pan standing by to catch any water left in the pump, and disconnect the drain line. Disassemble the pump as shown in the diagram. Do not remove the lowermost pump housing from the tub. If you have a wet/dry vacuum, you can use it to suck out any water remaining in the pump as you disassemble it. If not, use a turkey baster and sponge or an old towel to remove water.
LATER MODEL: Unplug the machine and disconnect the motor harness. Have a shallow pan standing by to catch any water left in the pump, and disconnect the drain line. Remove the securing screws from inside the tub, then remove the collar and lift the pump and motor out as a unit. You can then rebuild the pump on a bench.
About the only trick to reassembly is that the lower impeller must be shimmed to the proper clearance. This is the impeller with the tall center hub, and it can be difficult to keep the shims in place while you lower the impeller over the shaft. Use a little Vaseline™ to stick the shims to the shaft. To shim the impeller to the proper height, a cardboard gauge comes with the impeller kit.
There are two different impeller kits for two different designs. Make sure you get the right one. The new style lower impeller (the one with the shoulder) will work properly in an old machine. But if you put the older impeller into a new machine, it will drain during the wash cycle.
If you are replacing the seals because of a leak, make sure you turn the motor shaft by hand and check the motor for any stickiness or grittiness.
When you get the pump back together and hooked up, pour a gallon of water into the tub before starting the machine. Do not run the pump dry!!!

These are two-impeller, direct-reversing machines. The upper impeller is for wash, the lower for drain.
Older machines have a motor mounted in one corner of the machine, which drives the pump unit through a belt. Late model machines have the motor mounted right under the pump, but the parts are virtually the same.
Both the pump unit and motor can easily be removed without removing the machine.
Usually, when these machines go, either the drive belt wears out or the lower pump bearing is shot. The belt may squeal in either case. If the bearing is bad, usually it will feel very gritty when you turn it by hand.
The pump can be rebuilt, but I do not recommend a novice doing it. The lower impeller, lower bearing and drive pulley are difficult to remove and replace. The whole pump module or pump/motor unit can be replaced with a new or rebuilt unit. It's not cheap, but these are well-built machines, and usually they are worth the investment.
TECH TIPS
Unplug the machine and remove the kickplate. The belt stretches; you can just pop it off by hand. Unscrew the tower and remove the spray arms.
NOTE CAREFULLY where the two sealing rings are; they are in different places on different models. Make sure you get them back in place. If you don't, a jet of water will come from that joint, and may blow water past the door seal.
Then remove the strainer and filter. The pump module mounting screws are now accessible.
The filter screen can get clogged with sediment, bits of paper, soap film, etc. Rinse and clean it out with water and citric acid.
When replacing the module, put a little vegetable oil (VERY little!) around the seal to help it slip into place. Make sure it is centered and seated properly and the mounting screw holes are aligned. Tighten the screws as evenly as possible; i.e. tighten opposite screws in pairs.
When you get the pump/motor unit back into place and hooked up, pour a gallon of water into the tub before starting the machine. Do not run the pump dry!!!

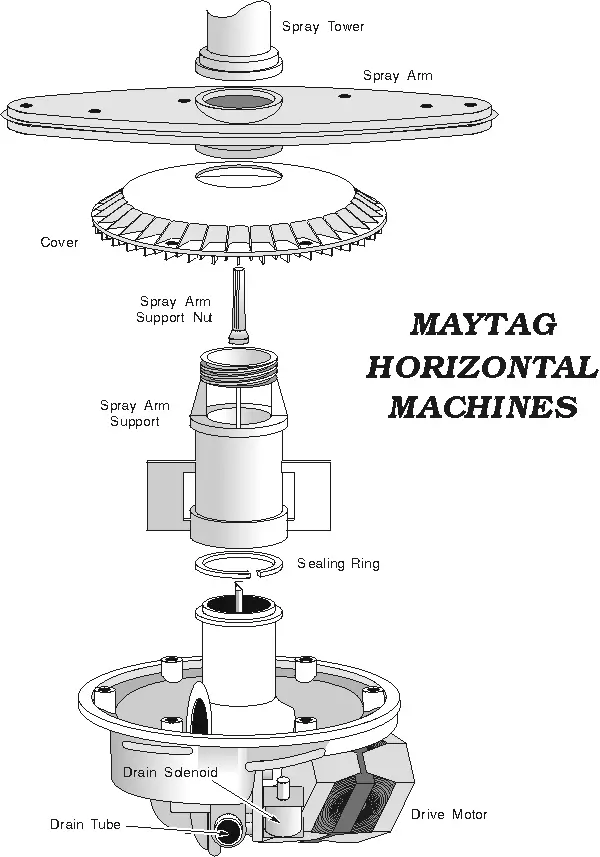
TECH NOTES
Maytag (sidewinders) are single-direction, horizontal-shaft machines. Drain is accomplished by a solenoid-operated drain valve.
Both the pump unit and motor can easily be removed without removing the machine.
If thepump is leaking or defective, the pump module can be replaced with a new unit.
The solenoid drain flapper valve can get stuck in these machines, or jammed open with food or debris. The symptom will be that the machine will seem like it is not filling. It actually is filling, but it is draining out just as quickly through the open drain valve. Take the cover off and make sure that the valve and spring operate properly. Sometimes, the very act of taking the cover off may fix the problem by itself.
TECH TIPS
Unplug the machine and remove the kickplate.
Unscrew the tower and remove the spray arm. Remove the cover screws and cover. Remove the spray arm support nut and spray arm support.
When replacing the module, put a little vegetable oil (VERY little!) around the seal to help it slip into place. Make sure it is centered and seated properly and the mounting screw holes are aligned. Tighten the screws as evenly as possible; i.e. tighten opposite screws in pairs.
When you get the pump/motor unit back into place and hooked up, pour a gallon of water into the tub before starting the machine. Do not run the pump dry!!!
TECH NOTES
These are vertical-shaft, single-direction, two-impeller machines. The upper impeller is for wash, and the lower impeller for drain. A solenoid drain valve opens for the drain cycle. If the machine seems to be draining during the wash cycle, the drain valve may be leaking. Check your diagnosis by opening the air gap during the wash cycle as described in section 3-1.
The pump can be disassembled and rebuilt in place. To remove the motor, you will probably need to remove the machine from beneath the kitchen counter.
Very late-model Kitchenaid machines are built by Whirlpool, and resemble Whirlpool machines in how they come apart. They are direct-reversing, vertical-shaft, two-impeller machines. Compared to the earlier Kitchenaids, their most distinguishing features are two spray arms instead of four, a square-shaped heater instead of round, and Torx-head screws instead of Phillips-head.
TECH TIPS
These are pretty straightforward machines to tear down and rebuild. Note carefully how everything comes off and in what order. The lower spray arms and strainer screen simply lift off.
The impellers are shimmed to the proper clearance. When disassembling, note carefully how many shims are beneath them, and reassemble with the same amount.
When you get the pump back into place and hooked up, pour a gallon of water into the tub before starting the machine. Do not run the pump dry!!!

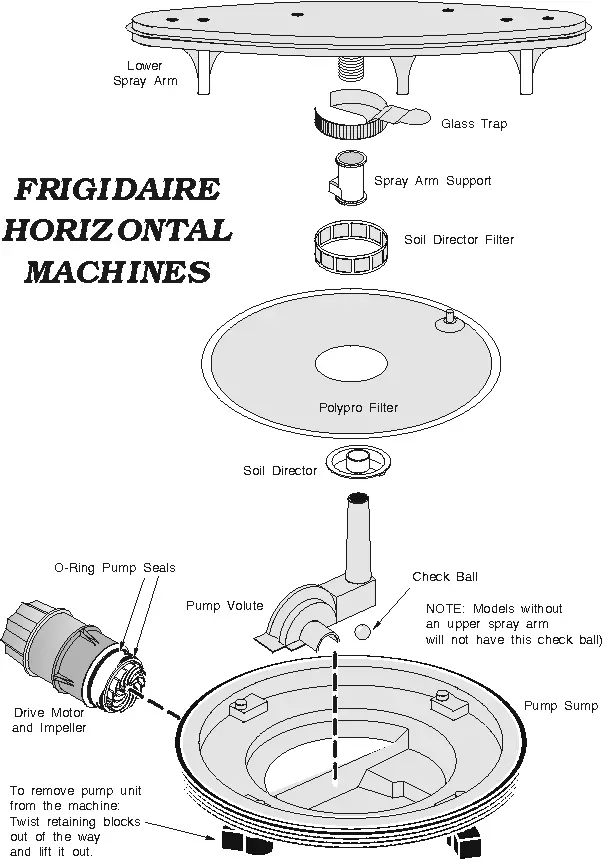
TECH NOTES
These are single-direction, horizontal-shaft machines. There is a separate drain pump and motor (separate from the wash pump and motor).
The pump and motor assembly can be easily removed with the machine in place.
TECH TIPS
Remove power from the machine and disconnect the motor wires and all hoses. Have a shallow pan standing by to catch any water when you remove the hoses. Remove the spray arms, glass trap and filters.
Twist the four retainers out of the way and lift out the pump and motor assembly.
To remove the motor from the pump assembly, first remove the motor bracket. Using a large screwdriver, pry the motor and impeller from inside the pump housing. There are two O-ring seals, so it will take some force to get the pump out of there. DO NOT "rock" the pump to get it out...just push it straight out from the inside. You can damage the housing and seal surfaces.
Re-assembly is basically the opposite of disassembly. Use a little Vaseline™ on the seals to help them slide into place.
When you get the pump/motor unit back into place and hooked up, pour a gallon of water into the tub before starting the machine. Do not run the pump dry!!!
TECH NOTES
These are direct-reversing, vertical-shaft, two-impeller machines.
The pump can be rebuilt, but if the top motor bearing is gone (which it usually is) then you must replace the whole pump/motor unit.
The pump, motor and upper and lower spray arms are removed as a single unit. To get to the motor mounts, you may need to pull the machine out from under the counter.
TECH TIPS
Disconnect power. Disconnect the motor harness. Remove hoses from the pump unit; have a shallow pan standing by to catch any water that may run out.
The pump plate is held in place by clips on the underside of the tub. These are secured by 11/16″ nuts. Loosen the nuts, twist the clips out of the way and lift the pump and motor unit out of the tub.
The heater element is mounted directly to the pump housing. The nuts that hold it on are tight as heck and usually cannot be removed without breaking the heater, the pump housing or both. If you are replacing the pump and motor unit and you want to save the old heater, use a pair of diagonals or channelocks and break the pump housing away from the heater. Wear goggles and be careful of bits of flying plastic. Soak the nuts thoroughly in penetrating oil before even trying to remove them. Be careful not to twist the heater element or you will ruin it. When re-installing the heater, use new rubber washers.
The same pump unit was used for models with heaters and without heaters. The new pump unit you get may not be drilled out for the heater, although there should be casting marks where the heater holes are supposed to be. You get to drill the holes.
When installing the new unit, be careful to get the pump centered and the rubber gasket seated properly.
When you get the dishwasher pump/motor unit back into place and hooked up, pour a gallon of water into the tub before starting the machine. Do not run the pump dry!!!

Please share our .