Dishwasher Troubleshooting
Find yourself a good appliance parts dealer. You can find them in the yellow pages under the following headings:
• Appliances, Household, Major
• Appliances, Parts and Supplies
• Dishwashers, Domestic
• Appliances, Household, Repair and Service
Call a few of them and ask if they are a dishwasher repair service, or if they sell parts, or both. Ask them if they offer free advice with the parts they sell (Occasionally, stores that offer both parts and service will not want to give you advice.) Often the parts counter men are ex-technicians who got tired of the pressures of in-home service. They can be your best friends. However, you don't want to badger them with too many questions, so know your basics before you start asking questions.
Some parts houses may offer service, too. Be careful! There may be a conflict of interest. They may try to talk you out of even trying to fix your own dishwasher. They'll tell you it's too complicated, then in the same breath "guide" you to their service department. Who are you gonna believe, me or them? Not all service and parts places are this way, however.
If you observe such buildup, periodically put about 1/4 to 1/2 cup of "Lime-Away"™ or Citric Acid (usually available at drugstores) in the machine and run it through a wash cycle, with or without dishes. Repeat as often as necessary.
If they genuinely try to help you fix it yourself, and you find that you're unable to, they may be the best place to look for service. Here's a hot tip: after what I just said, if they sold you this book, then I'll just about guarantee they're genuinely interested in helping do-it-yourselfers.
When you go into the store, have ready the make, model and serial number from the nameplate of the dishwasher.
NAMEPLATE INFORMATION
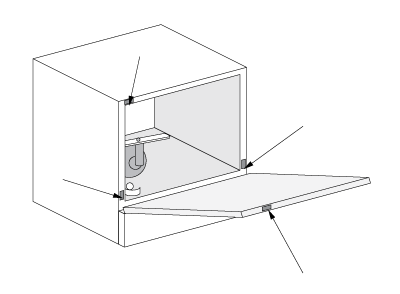
The metal nameplate is usually found inside the door as shown in figure 2-A. It may also be fastened to the top edge of the door itself.
If you cannot find the nameplate, check the original papers that came with your dishwasher when it was new. They should contain the model number somewhere.
In any case, and especially if you have absolutely NO information about your dishwasher anywhere, make sure you bring your old part to the parts store with you. Sometimes they can match it up by looks or by part number.
It's important to know that washing dishes in a dishwasher is not just a matter of blowing hot water at them. It is not just simply a mechanical or hydraulic process. It is also a chemical process. The chemicals you use, from detergent to rinse agent, are extremely critical. I recommend you use the following stuff regularly:
1) Use dry (powder) Cascade"™. The real stuff. Do not use liquid detergent. And especially do not use regular liquid dishsoap.
2) Use "Jet-Dry"™ and check it regularly. "Jet-Dry"™ causes water to sheet and run off the dishes, instead of beading up and spotting them. Also use a product called "Glass Magic"™ to assist in preventing filming of the glass surfaces or calcium buildup.
3) If you live in an area with hard water, be on the lookout for any white film buildup you may get in the tub. It may be most
obvious on any black plastic parts inside. This is primarily calcium. It can make plastic parts brittle and cause abrasion in moving parts, as well as spotting or filming on the dishes themselves.
In extreme cases of hard-water build-up, run 1/2 cup of white vinegar through a single rinse-and-drain cycle, without any dishes in the machine.
These are pretty specific product endorsements for me to make without getting paid to make them, don't you think? To be totally honest, there are other chemicals which may be "good enough." But why bother? The "good stuff" only costs a few pennies more, and furthermore, it can be found in just about any grocery store in the nation.
See chapter 3 for a more in-depth discussion of wash quality and its factors.
A few more pearls of wisdom:
Every few months, do a thorough cleaning. Pay special attention to any buildup of detergent around door seals, especially along the bottom edge of the door. Also be on the lookout for cloudy film or calcium buildup.
Every six months or so, open the kickplate and check for leaks. Also exercise the hot water shutoff valve under the sink, to make sure it will close when you need it to.
Every few months, open, check and if necessary, clean out the air gap. (See Chapter 3 for diagram)
Be sure you load the dishwasher properly. Cups, glasses, bowls, etc. should be upside-down so they don't hold water. Large items must be loaded so they do not block the waterjets from the spray arms, or block the spray arms themselves as they rotate. Silverware should be secure.
Re-coat or replace any rusty dishracks. You can purchase a paint-on dishwasher rack coating from your appliance parts dealer or local hardware store. Replacing rusty dishracks costs a bit, but a pump leak caused by rusty grit getting into the pump seals can cost you more.
POOR WASH QUALITY
This is the most common complaint in a dishwasher. It covers a lot of different specific symptoms, from spotting, film or etching of the dishes to food left on dishes. It is discussed in detail in Chapter 3.
NO POWER; MOTOR WON'T START
First check the house breaker or fuse.
Next, make sure that the dishwasher is plugged into the correct wall socket. (See the note in section 5-2 for an explanation)
The door is interlocked so that no fill or wash can occur while it's open. Check that the door locking lever is fully closed; this will close the door switch. Also check that the door switch is not defective as described in section 6-2(a).
Is the motor buzzing as described in section 6-2(c)? If so, the motor is locked up. It may be that something is jamming the pump. It may also be that the pump or motor bearings are bad, or the motor windings are fried; see Chapter 5.
Also check the junction box for burnt terminals; see section 6-2(e).
NO FILL
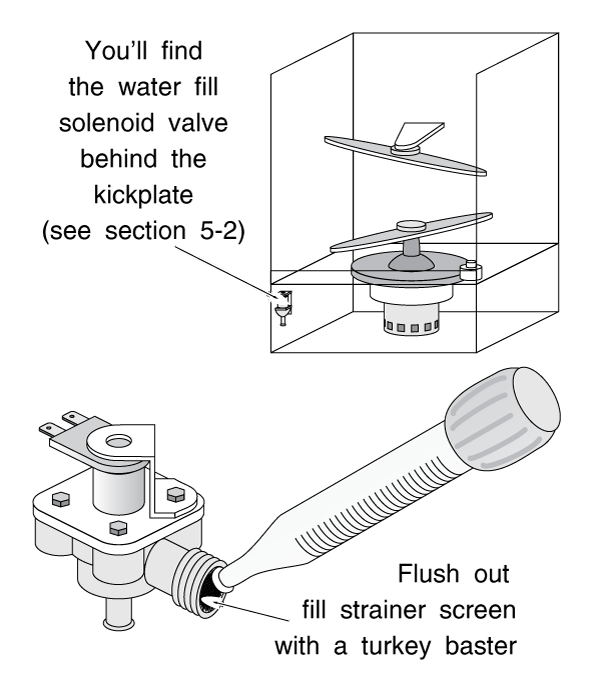
This is usually a defective water valve solenoid or clogged water valve. Try cleaning out the strainer screen as shown in figure 2-B; also test the solenoid for continuity. (Note that some Kitchenaid machines have a dual solenoid valve, with two solenoids. These valves should be tested as if they were two separate valves in series.) Replace the valve if defective.
When replacing the fill valve, use an O.E.M. part, or at least make sure the flow control washer is the same as in the original machine. Aftermarket parts may have a different flow control washer, which can cause high or low waterfill in your machine.
It could also be caused by the anti-flood float switch being stuck or defective. Rarely, but possibly, it can be traced to a burned contact inside the timer. Test as described in section 6-2 (a) and (b).
NO DRAIN, MOTOR RUNNING
This usually shows up as poor wash quality (severe spotting) due to cold water. Usually something is clogging the drain line or the Air Gap (see section 3-1.)
In GE or Kitchenaid machines, the drain valve solenoid may not be operating. Check the solenoid and also the timer (which controls it) as described in sections 6-2(a) and (b).
Another possibility is that junk has gotten into the drain pump impeller, and the vanes are broken clean off. Disassemble the pump as described in Chapter 5 and check the impeller.
TUB FILLS, BUT NO WASH OR NO DRAIN (MOTOR NOT RUNNING)
If you hear the motor trying to start (buzzing and clicking as described in Chapter 6) something is locking it up. It may be jammed with bits of food or glass. It may also be that a starting winding is burnt out.
If the machine is direct-reversing and it does start in one direction but not the other, then a starting winding is definitely burnt.
Disassemble or remove the pump and motor unit as described in Chapter 5. Clear whatever is jamming it. If you suspect that the motor is bad, check it as described in section 6-2(b).
If you don't even hear the motor trying to start, the timer contacts may be burnt out. Test and repair as described in section 6-2(b).
There is a also a motor starting relay. If this fails, it will cause similar symptoms. Test as described in section 6-2(c) and replace if defective.
NOISY OPERATION
Usually it is caused by bits of broken glass or rust getting into the pump impeller or spray arms. It is also frequently caused by worn out bearings in the pump or electric motor. Wasted pump bearings are a notably common problem in Maytag belt-driven machines.
Try removing the spray arms and clearing them of debris. This can be difficult, and it may be easier to replace them.
Take the pump housing apart as described in Chapter 5 and try turning the pump and motor shafts by hand. It should be smooth, without too much resistance. Any gritty feeling indicates bad bearings or stuff contacting the pump impeller.
MECHANICAL TIMER NOT ADVANCING
Usually the timer motor has gone bad. However, be sure to check the wiring diagram first, as described in Chapter 6. There may be several other switches in the circuit, for example thermostat or pushbutton selector switches.
The solution is to replace the defective motor or switch. If it's the timer, you may be able to get a rebuilt one to save a few bucks.
DIGITAL OR SOLID-STATE TIMERS AND CONTROLS are a whole different animal. See chapter 6.
WATER LEAKING ONTO FLOOR
If water is coming out the front of the machine, it's usually leaky door seals, but there are a few other suspects. The wrong soap can cause suds, which can leak out even if the seals are good. There are also some designs which can develop a water jet that blows water past the door seal; this is discussed in Chapter 4. Check for these problems first. If you still suspect the door seal, try cleaning any accumulated detergent or other gunk from it. If you need to replace the seals, your parts dealer has a door seal kit. See Chapter 4 for a more in-depth discussion of these and other possible leak sources.
If water is coming from beneath the machine, it is usually coming from pump seals, but it could also be coming from a hose or from the fill or drain solenoid valve. Remove the kickplate and operate the machine while looking beneath it. Try to isolate the leak by watching where the water drips on the floor. Remember that there are live wires under there; don't stick your hands in there while the machine is plugged in. Diagnose and repair as described in chapters 4 or 5.
DOOR DETERGENT DISPENSERS NOT WORKING
If the detergent dispensers are not popping open, usually a solenoid or bi-metallic trigger has failed. Remove the outer door panel as described in section 5-2 and test as described in section 6-2(f). It may also be that they are gunked up with detergent or rinse agent. Clean them out thoroughly.
The tools that you may need (depending on the diagnosis) are listed below. Some are optional. The reason for the option is explained.
SCREWDRIVERS: Both flat and Phillips head; two or three sizes of each. It's best to have at least a stubby, 4- and 6-inch sizes. For certain late model machines, you will need a size 20 Torx-head screwdriver.

NUTDRIVERS: You will need at least 1/4″ and 5/16″ sizes. 4- and 6-inch ones should suffice, but it's better to have a stubby, too.
ALLIGATOR JUMPERS (sometimes called a "CHEATER" or "CHEATER WIRE":) Small gauge (14-16 gauge or so) and about 12-18 inches long, for testing electrical circuits. Available at your local electronics store. Cost: a few bucks for 4 or 5 of them.
VOM (VOLT-OHM METER): For testing electrical circuits. If you do not have one, get one. An inexpensive one will suffice, as long as it has both "AC Voltage" and "Resistance" (i.e. Rx1, Rx10) settings on the dial. It will do for our purposes.
TURKEY BASTER: For flushing out water valves or draining water from pumps.
COPPER TUBING CUTTER: If you need to remove the dishwasher from its space under the countertop, you may need to cut the copper water feed line slightly shorter to get a new fitting on when you reinstall the machine.
BUTT CONNECTORS, CRIMPERS, WIRE NUTS and ELECTRICAL TAPE: For splicing small wire.
ELECTRICAL PLIERS or STRIPPERS and DIAGONAL CUTTING PLIERS: For cutting and stripping small electrical wire
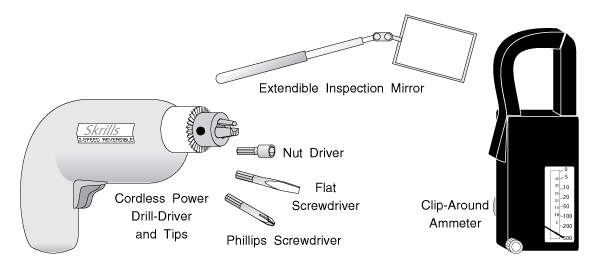
SNAP-AROUND AMMETER: For determining if electrical components are energized. Quite useful; but a bit expensive, and there are alternate methods. If you have one, use it; otherwise, don't bother getting one.
EXTENDIBLE INSPECTION MIRROR: For seeing difficult places beneath the dishwasher and behind panels.
CORDLESS POWER SCREWDRIVER OR DRILL/DRIVER WITH MAGNETIC SCREWDRIVER AND NUTDRIVER TIPS: For pulling off panels held in place by many screws. It can save you lots of time and hassle.
Many home handymen are very intimidated by electricity. It's true that diagnosing and repairing electrical circuits requires a bit more care than most operations, due to the danger of getting shocked. But there is no mystery or voodoo about the things we'll be doing. Remember the rule in section 2-6 (1); while you are working on a circuit, energize the circuit only long enough to perform whatever test you're performing, then take the power back off it to perform the repair. You need not be concerned with any theory, like what an ohm is, or what a volt is. You will only need to be able to set the VOM onto the right scale, touch the test leads to the right place and read the meter.
In using the VOM (Volt-Ohm Meter) for our purposes, the two test leads are always plugged into the "+" and "-" holes on the VOM. (Some VOMs have more than two holes.)
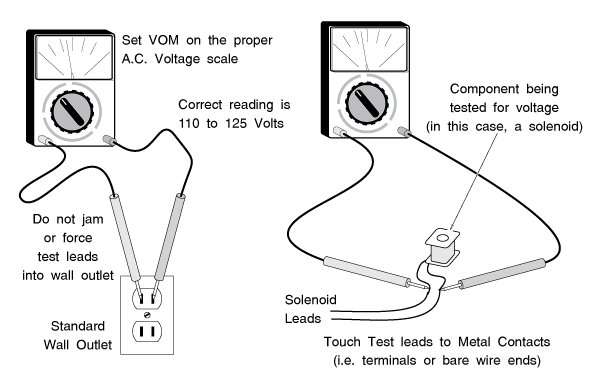
Set the dial of the VOM on the lowest VAC scale (A.C. Voltage) over 120 volts. For example, if there's a 50 setting and a 250 setting on the VAC dial, use the 250 scale, because 250 is the lowest setting over 120 volts.
Touch the two test leads to the two metal contacts of a live power source, like a wall outlet or the terminals of the motor that you're testing for voltage. (Do not jam the test leads into a wall outlet!) If you are getting power through the VOM, the meter will jump up and steady on a reading. You may have to convert the scale in your head. For example, if you're using the 250 volt dial setting and the meter has a "25" scale, simply divide by 10; 120 volts would be "12" on the meter.
Don't let the word "continuity" scare you. It's derived from the word "continuous." In an electrical circuit, electricity has to flow from a power source back to that power source. If there is any break in the circuit, it is not continuous, and it has no continuity. "Good" continuity means that there is no break in the circuit.
For example, if you were testing a solenoid to see if it was burned out, you would try putting a small amount of power through the solenoid. If it was burned out, there would be a break in the circuit, the electricity wouldn't flow, and your meter would show no continuity.
That is what the resistance part of your VOM does; it provides a small electrical current (using batteries within the VOM) and measures how fast the current is flowing. For our purposes, it doesn't matter how fast the current is flowing; only that there is current flow.
To use your VOM to test continuity, set the dial on (resistance) R x 1, or whatever the lowest setting is. Touch the metal parts of the test leads together and read the meter. It should peg the meter all the way on the right side of the scale, towards "0" on the meter's "resistance" or "ohms" scale. If the meter does not read zero ohms, adjust the thumbwheel on the front of the VOM until it does read zero. If you cannot get the meter to read zero, the battery in the VOM is low; replace it.
If you are testing, say, a solenoid, first make sure that the solenoid leads are not connected to anything, especially a power source. If the solenoid's leads are still connected to something, you may get a reading through that something. If there is still live power on the item you're testing for continuity, you will burn out your VOM instantly and possibly shock yourself.
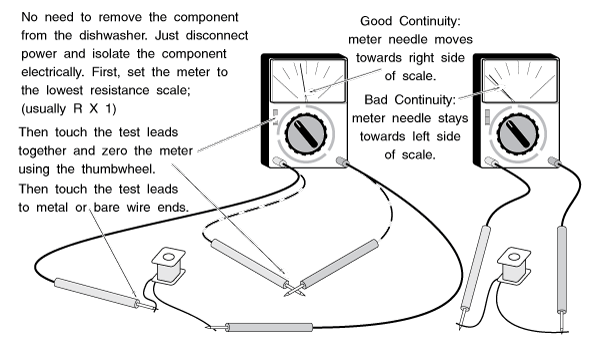
Touch the two test leads to the two bare wire ends or terminals of the solenoid. You can touch the ends of the wires and test leads with your hands if necessary to get better contact. The voltage that the VOM batteries put out is very low, and you will not be shocked. If there is NO continuity, the meter won't move. If there is GOOD continuity, the meter will move toward the right side of the scale and steady on a reading. This is the resistance reading and it doesn't concern us; we only care that we show good continuity. If the meter moves only very little and stays towards the left side of the scale, that's BAD continuity; the solenoid is no good.
If you are testing a switch, you will show little or no resistance (good continuity) when the switch is closed, and NO continuity when the switch is open. If you do not, the switch is bad.
Ammeters are a little bit more complex to explain without going into a lot of electrical theory. If you own an ammeter, you probably already know how to use it.
If you don't, don't get one. Ammeters are expensive. And for our purposes, there are other ways to determine what an ammeter tests for. If you don't own one, skip this section.
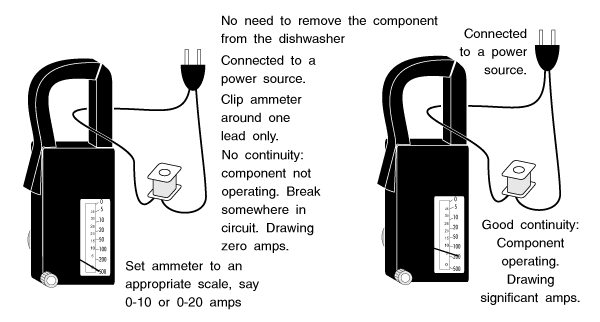
For our purposes, ammeters are simply a way of testing for continuity without having to cut into the system or to disconnect power from whatever it is we're testing.
Ammeters measure the current in amps flowing through a wire. The greater the current that's flowing through a wire, the greater the density of the magnetic field, or flux, it produces around the wire. The ammeter simply measures the density of this flux, and thus the amount of current, flowing through the wire. To determine continuity, for our purposes, we can simply isolate the component that we're testing (so we do not accidentally measure the current going through any other components) and see if there's any current flow.
To use your ammeter, first make sure that it's on an appropriate scale (0 to 10 or 20 amps will do). Isolate a wire leading directly to the dishwasher you're testing. Put the ammeter loop around that wire and read the meter. (Figure 2-G)
Please share our .