Refrigerator Repair & Icemaker Repair
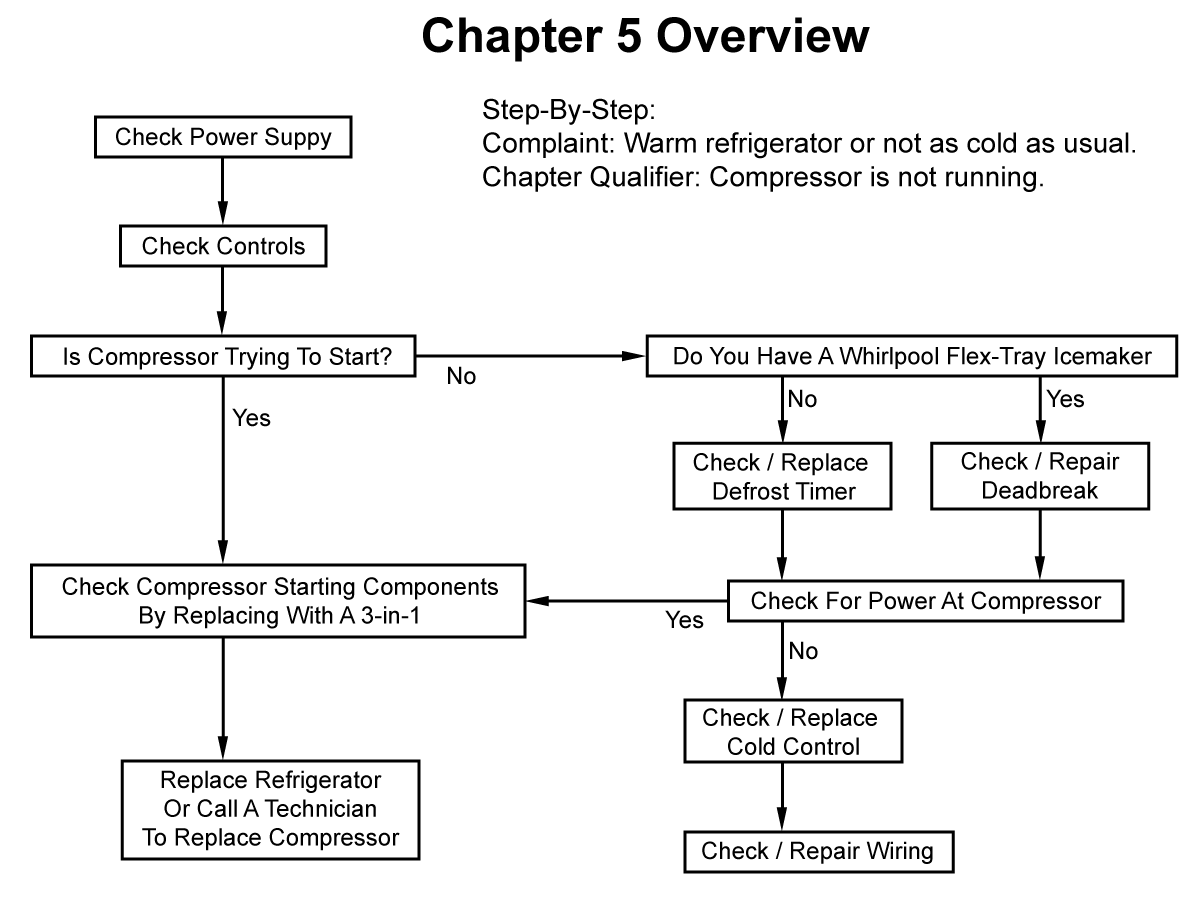
If your refrigerator is not cold (or not as cold as usual) and you have determined that the compressor is not running (see the first page of Chapter 4,) first check that the fridge has power. If you have interior lights in the fridge, you have power. If you don't have interior lights, check your house breaker. Also check your wall outlet by unplugging the fridge and plugging in a portable appliance such as a blow-dryer or electric shaver.
When you have established that power is getting to the fridge, check your controls. They sometimes have a way of getting magically turned off, especially in households with kids. (See section 4-1)
Listen carefully to the fridge for a two or three minutes. If you hear a "CLICK-BUZZZZZZ-CLICK" (with a buzz of between about 5 and 30 seconds) then you are getting power to the compressor. There is something wrong with the compressor or compressor starting components (relay or overload.) See section 5-3(e).
How you diagnose a non-starting compressor depends much upon whether you have a mechanical defrost timer or ADC (Adaptive Defrost Controls.)
If you have a fridge with ADC and the lights are on, and the compressor will not start, you need to check if you're getting voltage to the compressor starting components as described in Section 5-3(b). If you are not getting voltage to the starting components, the cold control or ADC board is bad. Check these components as described in section 5-3(c).
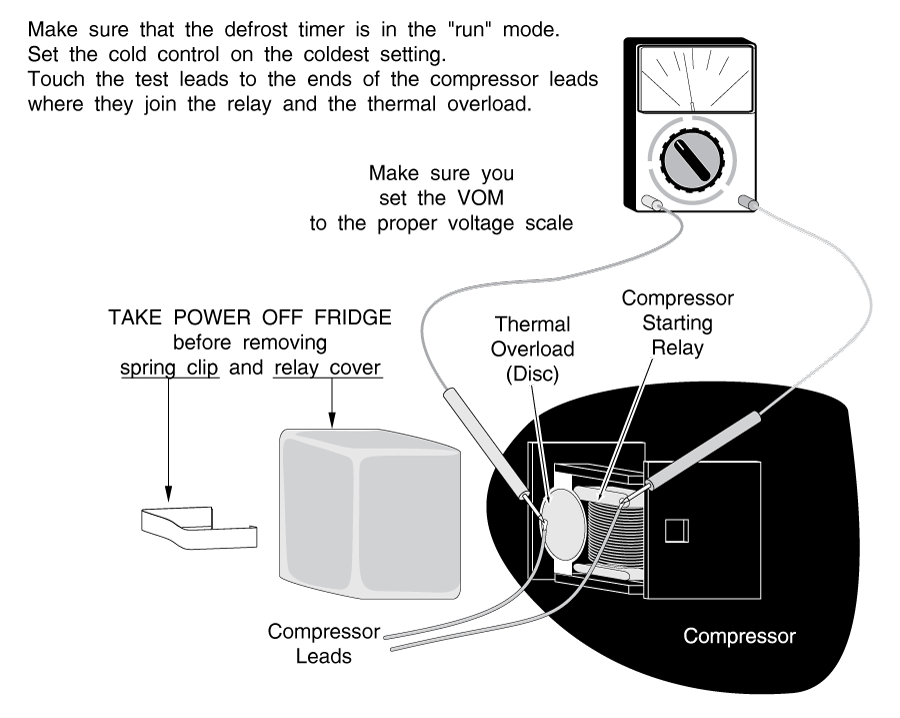
If you have a fridge with a mechanical timer and you hear nothing at all, set the cold control on the coldest setting and advance the defrost timer. If it is stuck in the defrost mode, the compressor will not run. The terminating thermostat will open and stop the heater at a certain temperature, so the fridge will not continue to heat up. You will hear, see and feel nothing but a fridge that's not cold. It's as if it wasn't even plugged in, except that the interior lights will still be on.
(See section 4-5(d) and Figure 24 for details on how to advance the timer). Place a screwdriver in the advancement pinion and advance the timer manually (remember, clockwise only) about 1/4 to 3/8 of a turn. Does the compressor start? If it does, replace the defrost timer. If this does not start the compressor, make sure you leave the timer in the "run" mode for the rest of your diagnosis. Go to section 5-3(b).
In a Whirlpool flex-tray icemaker as described in section 4-6, the defrost timer is integrated into the icemaker.
The defrost switch might fail into a "deadbreak" position in which nothing runs, similar to that described above. To test for deadbreak, first unplug and remove the icemaker from the freezer compartment. Look at the timing gear housing on the back of the icemaker head. You will see a white circle, about 5/8″ in diameter (Figure 34). Examine the circle closely. You will see an arrow molded into the circle. If this arrow lines up with the arrow molded into the black timing gear housing, then you might have a deadbreak.
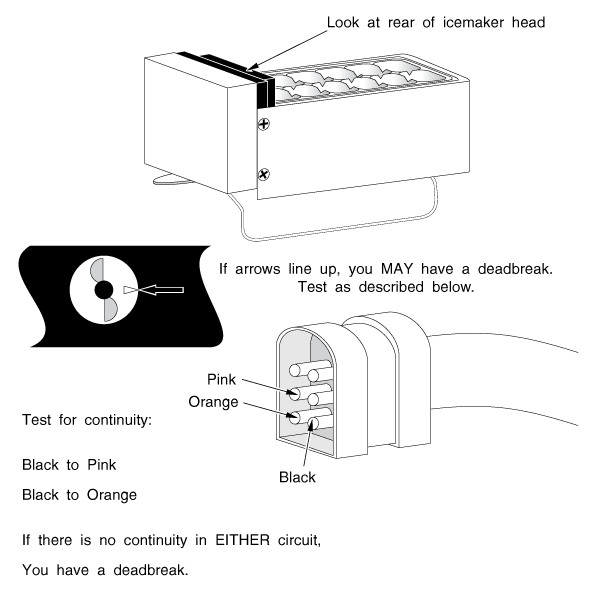
Test for continuity between the BLACK and PINK terminals and the BLACK and ORANGE terminals of the plug (see Figure 34). One or the other should show continuity. If neither does, you have a deadbreak. Replace the defrost switch and gear sets as described in section 4-6.
If you still hear nothing at all, pull off the lower back panel of the fridge, remove the compressor relay cover. This is the square-ish plastic or bakelite box attached to the side of the compressor.
Test for voltage at the two compressor leads. (Figure 35)
If you have voltage to the compressor but it is not starting, see section 5-3(e).
If you do not have voltage to the compressor, check the cold control as described in section 5-3(c).
If you have a mechanical timer, and you don't have voltage to the compressor, use your alligator jumpers to connect the two wires of the cold control. (See section 4-9) If you now have power to the compressor, the cold control is bad. Replace it.
If you have ADC, jumper the cold control terminals as descibed above, and wait for 30 minutes, then check for voltage at the compressor. This will give the ADC time to finish any defrost cycle it might be in, and re-enter the cooling cycle. If you now have power to the compressor, the cold control is bad. Replace it. If not, the ADC board is bad. Replace it.
If the test in section 5-3(c) doesn't start the compressor, you're going to have to get a wiring diagram (there may be one pasted to the back of the refrigerator) and start tracing wires with your VOM to figure out where you're losing power. Check for dead mice beneath your fridge— sometimes they get under there and start chewing wires. If you're thoroughly intimidated by electricity, then call a technician.
If you do hear a sound, it will be something like: "CLICK-BUZZZZZZZZZZ-CLICK." The buzz will be between about 5 and 30 seconds long, and it will repeat within a minute or two. What's happening is that your compressor is trying to start, but it can't, and the electrical overload is cycling on and off. It might be that one of your compressor starting components is bad, or that your compressor motor is wearing or worn out.
With modern, solid-state starting components such as those pictured in figure 36, you may not hear clicking and buzzing as you do with older machines. If there is power to the components, but the compressor won't start, either the compressor or starting components are bad.
You may be able to test each starting component and replace the bad one. However, I've found that the quickest and easiest way to diagnose this problem is to replace all three with a solid state "3-in-1" unit, or just replace all the components. They aren't that expensive.
In the parts houses, "3-in-1" units are also known as "hard start" units. They contain circuitry that provides a little extra power to start a hard-starting compressor.
First, remove the old starting components. (See Figure 36) Note carefully how they came off, in case you need to re-install them. Install the "3-in-1" using the instructions that come with it. (Figure 37). You can use your alligator jumpers to wire it in temporarily. Make sure the "3-in-1" you get is rated for the horsepower of your compressor.

If your refrigerator has solid state starting components, the "3-in-1" may fit onto your fridge directly, or it may not fit at all. If your case is the latter, you will need to get the original equipment replacement relay assembly for your fridge.
If your compressor doesn't start with the "3-in-1," the compressor's dead. You will hear the overload in the "3-in-1" cycling (CLICK-BUZZZZ-CLICK.) It's time to call a tech for a compressor job, or to think about getting a new fridge. If your refrigerator does start, unplug the refrigerator and wire your "3-in-1" in permanently. Use butt connectors, wire nuts and electrical tape.
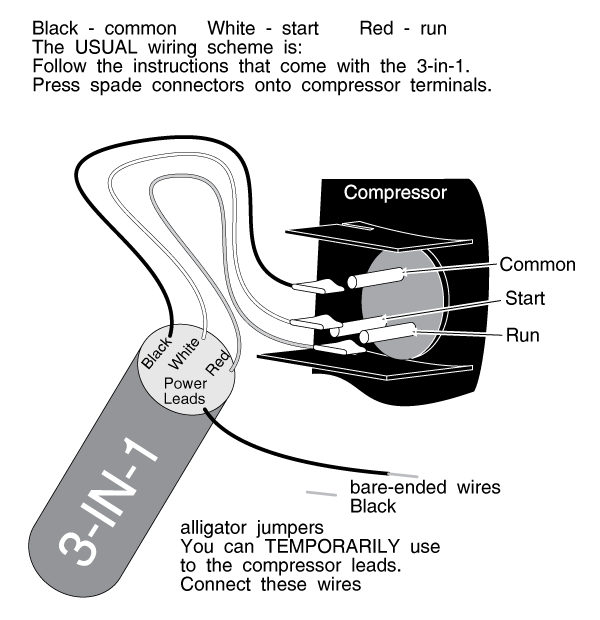
Make sure that none of the compressor terminals are touching each other or the metal housing of the compressor. Also make sure you cover the compressor terminals with a shield; usually you can use the old plastic relay cover and just lead the wires into it.
If the cause of your compressor's not starting was bad starting components, it will continue to run indefinitely.
If the cause of it not starting was that the compressor motor is getting worn out, the "3-in-1" will prolong the life of your compressor for somewhere between a few hours and a year or two.
You have no way of knowing which it was, or how long it will last, without some expensive tests that probably won't tell you much anyway. Count your blessings and start saving up for a new fridge (or a major repair), just in case.
Please share our .
